CSS Selectors | An In-depth Guide
A selector is the first part of a CSS rule and is used to target the HTML elements you want to style. I gave an introduction to CSS selectors in my Introduction to CSS tutorial which you can check out for reference. In this tutorial I will now get into more details about the various CSS selectors.
Basic CSS selectors
Universal selector
This is represented by an asterisk (*) and is used to target every single element on the page. This selector is normally used for zeroing out, that is, setting all the margins and padding values of HTML elements to zero so that web pages render consistently in every browser.
Type selector
This targets HTML elements based on the element name for example h1, p, a, or semantic names like body, article or footer.
Id selector
Represented by the hash symbol (#) followed by the id name and targets a unique HTML element with the specified id. The syntanx is;
#id-name {style properties}
This selector is important if you want to uniquely style an individual element since you cannot have more than one element with the same id in a HTML document.
Class selector
Represented by a period (.) followed by the class name and targets all HTML elements that contain the class attribute that matches the selector.
.class-name {style properties}
Unlike the id selector, the class selector is useful if you need to apply the same style to multiple HTML elements.
How to Group CSS Selectors
Grouping selectors helps us to avoid repetition in our code where we may have different HTML elements having the same style properties. With this technique we are able to target multiple HTML elements at once and only state their style definitions also once.
To group selectors, we separate each selector with a comma (,) as shown below;
selector1, selector2, … selectorn {style properties}
The grouped selectors are not necessarily of the same type but can be of different types for example we could group a class selector with an id selector as long as they share style definitions.
Attribute selectors
These target any HTML elements on a page that have a specified attribute. An attribute is content added to the opening tag of a HTML element for example id, class, name or value.
The basic syntax of the attribute selector is enclosing the name of an attribute in square brackets, that is, [attribute]
For example, if you want to set the font size of every element with a title attribute to 16px we use;
[title] {font-size: 16px;}
The table below shows the seven attribute selectors
| Attribute Selector | Description |
|---|---|
| [attribute] | Selects all elements that exactly match the specified attribute |
| [attribute=”value”] | Selects all elements with attribute that matches the specified value. |
| [attribute*=value] | Selects every element whose attribute contains at least one occurrence of the specified value. |
| [attribute^=value] | Selects every element whose attribute begins with the specified value |
| [attribute$=value] | Selects every element whose attribute ends with the specified value |
| [attribute~=value] | Selects all elements with an attribute containing the specified value. |
| [attribute|=value] | Selects elements if the Element has specified attribute equal to exact value within hyphen-separated list. |
Let me demonstrate the use of these selectors in detail using the example below
<!DOCTYPE html>
<html>
    <head>
        <title>CSS Selectors</title>
        <link rel="stylesheet" href="style.css"/>
    </head>
    <body>
        <h1>Attribute Selectors</h1>
        <ul>
          <li><a href="https://mytectutor.com/category/css">CSS for beginners</a></li>
          <li> <a href="https://mytectutor.com/introduction-to-html">Learn HTML from scratch.</a></li>
          <li><a href="#internal">Internal link</a></li>
         <li><a href="https://www.w3schools.com/css/css_attribute_selectors.asp">External link</a></li>
       </ul>

       <p class="myText"> Some text here</p>
       <p class="warning"> Add more text here!</p>
       <p class="moreText myText"> Still more text here...</p>
       <p class="myText"> More text to be added here soon</p>

       <div lang="zh-CN"> 你需要学习中文。 </div>

    </body>
</html>
The CSS styling with the various attribute selectors is given below.
*{
	margin: 0;
	padding: 0;
}

a[href="https://codefortheweb.com"] {
  color: #E18728;
  font-size: 16px;
}

[class*="warning"] {
        color: #fff;
        background: red;
}

a[href$="html"] {
		font-style: italic;
		color: blue;
		text-decoration: none;
}

a[href^="https"][href$=".asp"] {
  color: #B00C0E;
}

div[lang|="zh"] {
	font-weight: bold;
    color: red;
}

[class~="myText"] {
  padding: 2px;
  color: green;
}
I’ll now explain the role of the various css attribute selectors used in the example above.
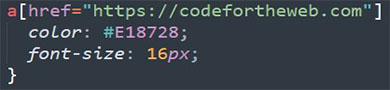
Target only the link with the exact href value https://codefortheweb.com and change its color and font-size.
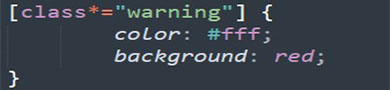
Targets any HTML element with a class attribute that contains space-separated values, one of which is “warning”.
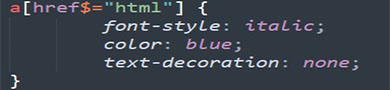
Targets every link that ends with “html” and changes its font-style, color and removes the underline on the link.
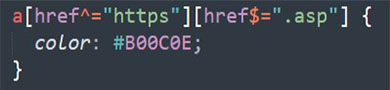
Targets links that start with “https” and end in “.asp”
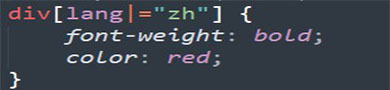
All divs in Chinese are red in color and bold.
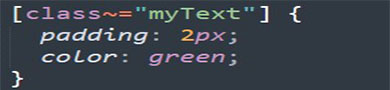
Elements whose class attribute contains the word “myText” are green in color with 2px padding
Descendant Selectors
A descendant selector is used where there is need to limit the targeted elements to the ones who are descendants of another element.
The descendant combinator is represented by a single space ( ) between the parent element and the descendant element.
parent-selector target-selector {style properties}
Foe example, p strong {color: blue;}
This means all bold text inside a paragraph tag will be blue in color.
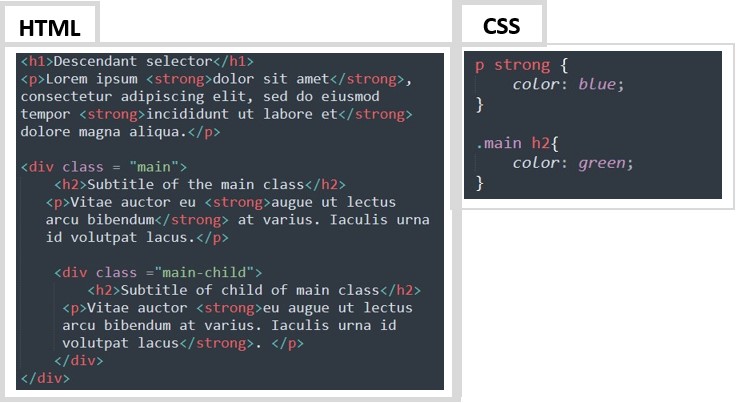
A descendant element in this case is not only the direct child of the parent element, but all the corresponding children all the way down the hierarchy regardless of how nested they are as demonstrated below.
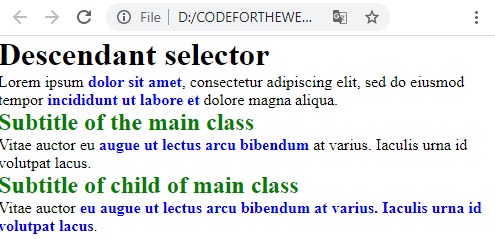
All bold text will have a color blue and h2 subtitles have a green color.
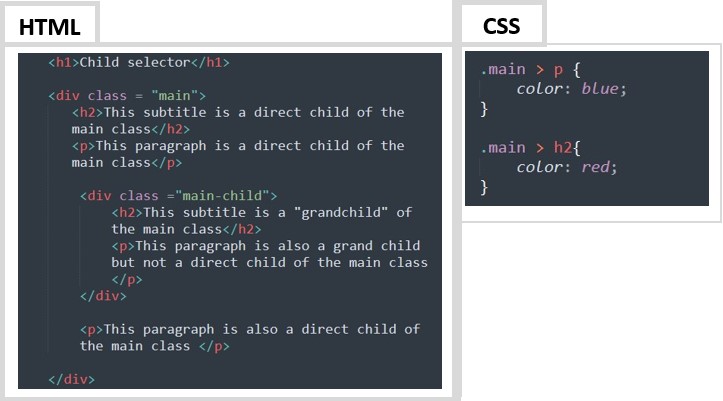
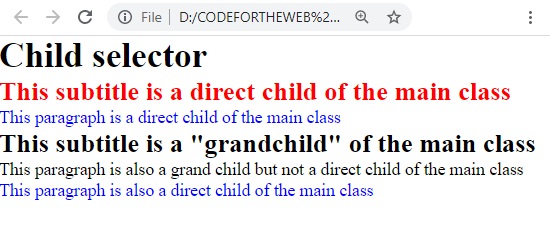
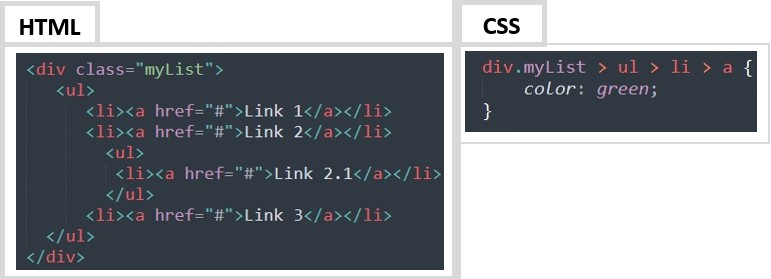
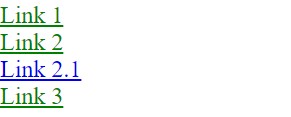
Child selectors
Unlike the descendant selector that targets all corresponding children and grandchildren of one or several elements, a child selector is more specific and only targets the direct children of an element.
This combinator is represented by a prompt (>) and the syntax is;
parent-selector > direct-child-selector {style properties}
I’ll use the example below to demonstrate the use of child selectors.
General Sibling selector
The general sibling selector allows you to target elements based on other elements within the same parent or child scope.
The general sibling combinator is represented by a tilde (~) character in between the selectors in question and the syntax is;
parent/child-selector ~ sibling-selector {style properties}
In this example, the general sibling selector is used to specify that paragraph elements which are siblings to an H2 element should be in the blue in color with italic font style.
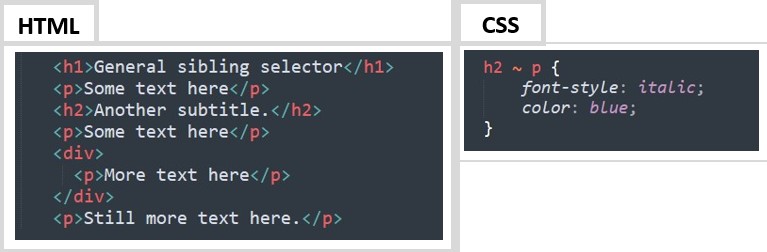
However, you notice that the first paragraph is not affected because it comes before the h2 element in the markup and also the paragraph inside the second div element is also not affected because it is not directly related to the h2 element.
It is worth noting that the sibling selector does not affect grandchildren and the first part of the selector needs to be present in the markup before the targeted element, eve
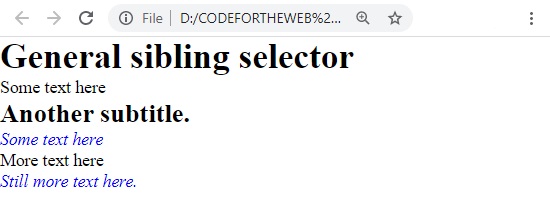
Adjacent sibling selector
This selector enables us to be more specific with the sibling elements we are targeting, that is, using the adjacent sibling selector, we can target elements to only include the first element which comes immediately after the first element in the markup.
The adjacent sibling combinator is represented by a plus symbol (+) in between the selectors in question and the syntax is;
parent/child-selector + sibling-selector {style properties} I’ll use the example below to explain this type of selector in more detail.
In the example above, I have used the adjacent sibling selector to specify that the first paragraph element after all H2 elements should be blue in color and use italic text.
If we had used the general sibling selector, like we did in the previous chapter for an example much like this one, all paragraph elements after the first H2 element would be targeted.
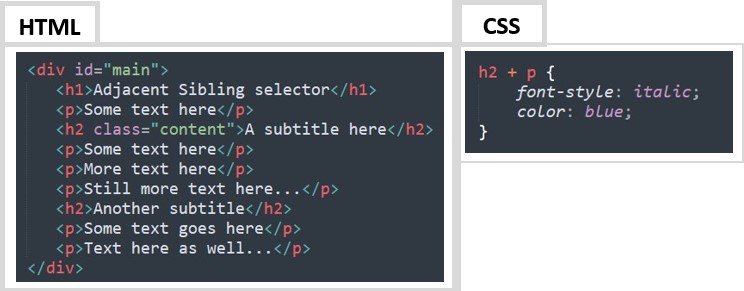
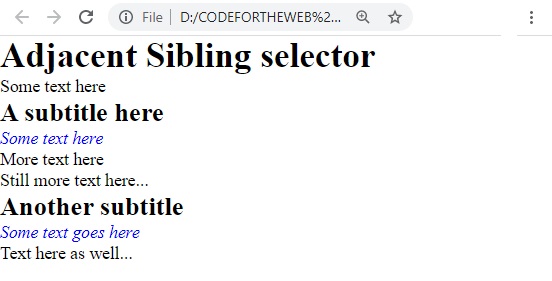
You can use various modifiers to make the adjacent sibling selectors as specific as you want them to be.
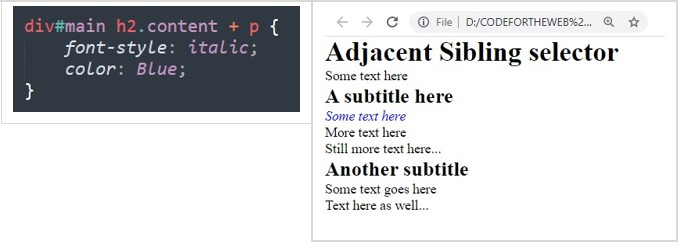
In the example below, still using the same HTML code from the previous example but I have targeted only the first paragraph element after H2 element with class “content” in the div element with id “main”.
Pseudo Selectors
Pseudo class selectors
These are used to apply certain properties to target elements that cannot be applied using the common combinators or selectors like id or class. Pseudo class selectors target elements based on their attributes, states and relative position.
The syntax of a pseudo class selector is a colon (:) placed just after a CSS selector.
selector : pseudo-class {property:value;}
For example
.list a:visited{ color: red;}
the :visited pseudo-class will select links that have already been visited by the current browser and change the color of these links to red.
Psuedo element selectors
A pseudo-element selector is identified using two colons (::) and is used to target elements that have been created but do not normally exist in the document tree.
selector :: pseudo-element { property: value;}
For example
p ::first-letter{
color:blue;
font-size:18px;
}
Here the ::first-letter pseudo-element is used to make the first line of the text in all <p> elements blue in color with text size of 18px.
As far as pseudo-classes and pseudo-elements are concerned, this was only an introductory overview. Due to the diversity and importance of this subject, I will have another tutorial with in-depth details covering pseudo-classes and elements.