Disk Management “Cannot shrink a volume beyond the point” when Resizing a Partition – Issue Resolved.
If you have tried to shrink the volume of your computer hard drive partitions using Windows Disk Management, you may have probably come across a situation where the maximum possible shrink size is provided by the system and you cannot shrink the volume beyond that given point.
I’ll use the example below to guide you on how to resolve this issue. In this case I was trying to shrink the volume of Local Disk D partition which had over 130GB of free space.
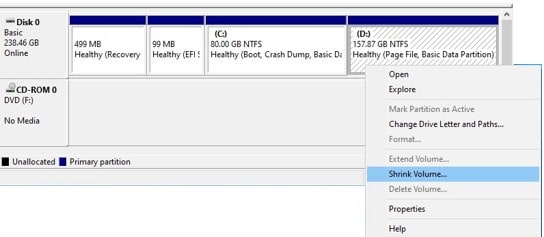
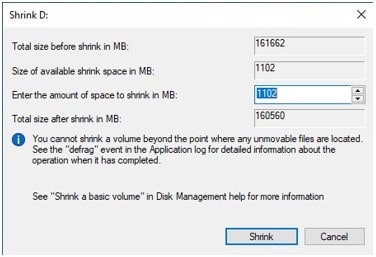
The WindowsDisk Management console provided only 1GB as the space available for shrinking and I was not able to enter a larger amount of disk space beyond this.
To resolve this situation, I had to temporarily disable hibernation, the Paging file and the System Restore feature using the steps below;
1. Disable the hibernation feature by running the command powercfg /hibernate off in command prompt as administrator. This turns off the hibernate feature and clears the hiberfil.sys from the system drive.
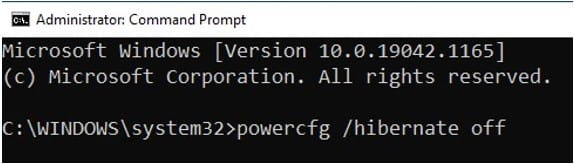
If you run this command from a non-elevated command prompt, you’ll get errors like “Unable to perform operation. An unexpected error (0x65b) has occurred: Function failed during execution when turning off/on hibernation.”
OR “This command requires administrator privileges and must be executed from an elevated command prompt.”

2.Disable System Restore
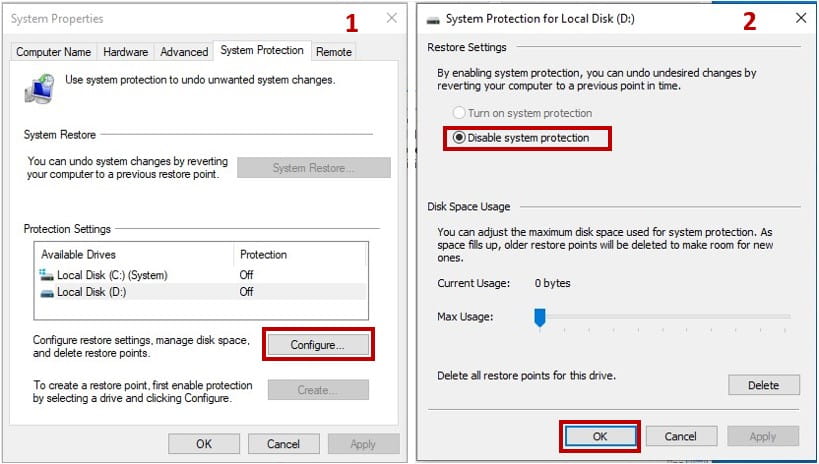
Launch systempropertiesprotection.exe from the Run dialog
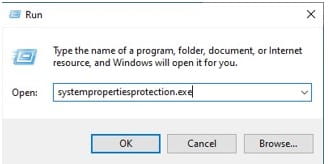
This opens the System Properties panel.
- Under System protection, select the system drive you want to shrink for example Local Disk (D) and click Configure
- Another panel for System Protection for the selected drive opens. Click Disable system protection and click OK.
This turns off System Restore and also erases all the restore points.
3.Disable the Paging file
Launch systempropertiesadvanced.exe from the Run dialog.
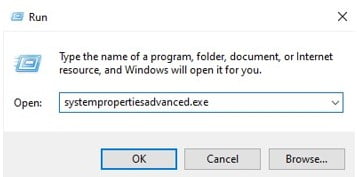
The System Properties panel opens.
- Go to the Advanced tab and under Performance section, click Settings,
- This opens the Performance options panel and under Advanced tab, look for Virtual memory section and click Change to open the Virtual Memory panel.
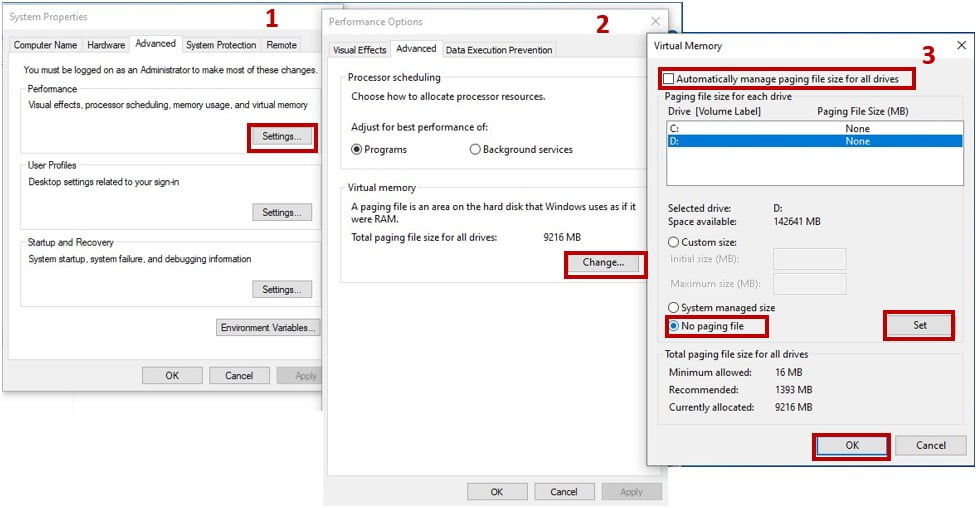
- Uncheck Automatically manage paging file size for all drives
- Select No paging file, click Set and OK.
The following warning message will appear after you click OK.
If you disable the paging file or set the initial size to less than 200 megabytes and a system error occurs, Windows might not record details that could help identify the problem. Do you want to continue?
Click Yes to continue.
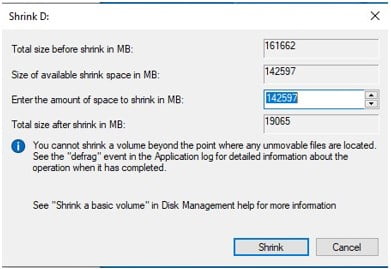
4. Restart Windows and open Disk Management and try to shrink the system volume again. This time you should be able to shrink the drive to the required size as you want. Like in my case the size of available shrink space was increased to 139GB as shown below.
5. Re-enable System Restore, Paging file and Hibernate features
After shrinking the volume as desired, don’t forget to reverse the system settings that you changed earlier so that the Paging file, System Restore and Hibernate are re-enabled.
I’ll summarize the settings below since I have already described the steps in detail before.
- Enable Hibernation using command prompt as administrator and run the command powercfg /hibernate on
- Enable System Restore by launching systempropertiesprotection.exe from the Run dialog. Select the system drive and click Configure. Click Turn on system protection and OK.
- Enable the Paging file by launching systempropertiesadvanced.exe from the Run dialog. Under Performance, click Settings, click Advanced button. Click the Change button. Select the system drive, click System managed size, and click Set. Enable Automatically manage paging file size for all drives. Click OK.
- Restart Windows
Hope this will help you resolve the issue that was preventing you from shrinking the volume of a given disk partition for your Windows computer using Disk Management console.