How to Delete Recovery Partition Using ‘Diskpart’ in Windows 10.
Often times you may want to provide more disk space by deleting recovery partitions and allocating that space to other drives. However, Windows does not allow deletion of Recovery Partitions using Disk Management and this can be rather challenging when you want to combine two disk partitions, but they are separated by a recovery partition.
What is Recovery Partition?
Recovery partition is a small partition on your hard drive that can help you restore your Windows Operating system or troubleshoot system issues in case of any system failures.
There are two kinds of recovery partitions.
The first is the one created as a system reserved partition during the installation of Windows operating system on a hard drive disk or if you use Windows Setup to create new partition on an MBR disk. If it is a GPT disk, then Windows will create a recovery partition and an EFI system partition without drive letter.
The second is set by the computer manufacturer (like Lenovo, Dell or HP). It occupies a significant amount of disk space since it is this part of the recovery partition that contains the manufacturer settings for application drivers and other things that allow you to restore these default settings. This partition is also called the OEM section.
Every time when you upgrade Windows to the next version, the upgrade program will create a recovery partition if it detects that there is no sufficient space on your recovery partition (GPT disk) or system reserved partition (MBR disk). This is why you may find many Recovery partitions
Recovery Partitions in Windows Disk Management.
When you check Disk Management, Recovery partitions are labeled “Healthy (Recovery Partition)” and have no letters. Also, if you right click these partitions, you only have the ‘Help’ option unlike other partitions with more options like ‘Open’, ‘Shrink Volume’, ‘Extend Volume’ and others.
Deleting the Recovery Partition
You cannot delete a recovery partition with Windows Disk Management because it contains vital system files. You can use diskpart.exe to delete recovery partition.
As mentioned above, when a system is updated, a new recovery partition is created. This means the old recovery partition will be outdated and can therefore be deleted to free up some disk space.
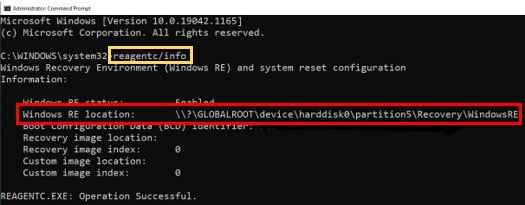
To find out which recovery partition is best to delete, open command prompt as an administrator and run the command ‘reagentc /info’.
This will give the location of Windows Recovery Environment (Windows RE location). In the example shown below, this points to “… \harddisk0\partition5\…”
After locating the Recovery partition to delete, you can go ahead and erase it using the in-built utility Diskpart following the steps below.
Deleting the recovery partition using Diskpart
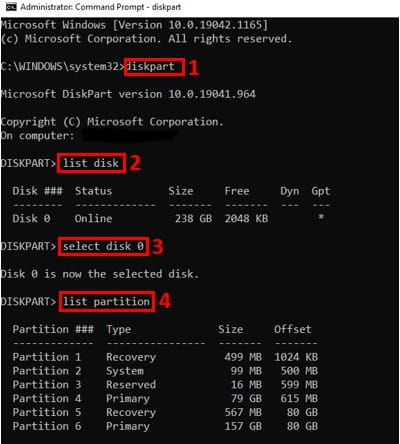
Using command prompt as administrator, run “diskpart” command to enter DiskPart.exe.
Type ‘list disk’ command to view all the disks present in your computer system.
The ‘select disk n’ command selects the disk where the recovery partition is located. n is the disk number that was given by the reagent command above. In this case am dealing with harddisk0.
After selecting the disk, run the ‘list partition’ command to get the list of all the partitions on the given disk. You can see the Recovery Partition under the Type column.
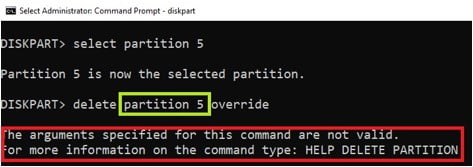
A common mistake that you may make at this step is to include the partition number in the command for deleting. For example, in the above case you may be tempted to type ‘delete partition 5 override’. This will give the error “The arguments specified for this command are not valid” as shown below.
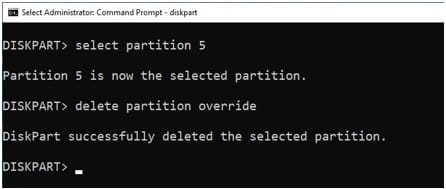
There’s no need to append the command with the partition number when the partition is already selected. So just use ‘delete partition override’ to erase the selected recovery partition.
Also, if you want to delete more than one recovery partition you need to go through this procedure separately for each section to be deleted.
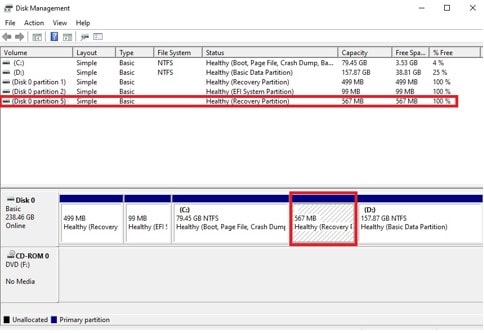
Restart the computer after deleting the recovery partition and if you check Disk Management the partition now appears as “Unallocated” and you can use this to extend the volume of another partition.
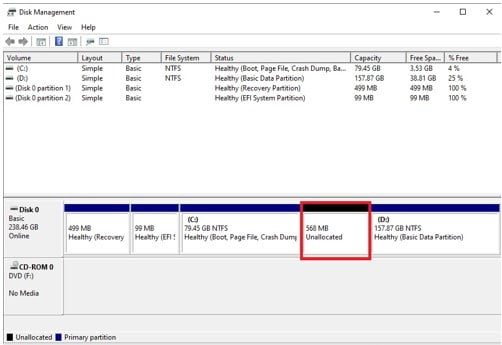
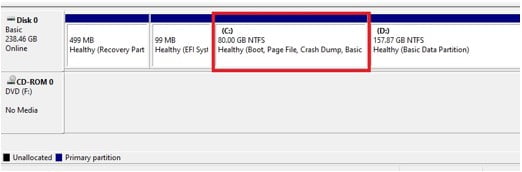
From the diagram above, the unallocated space got after deleting Recovery partition can be used to extend the C drive since the unallocated space is on the immediate right of the C drive in the Disk Management tool.
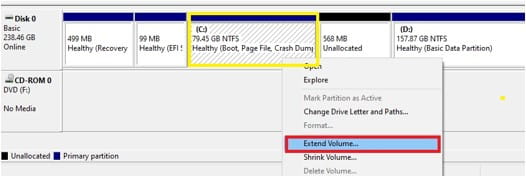
Extending C Drive using the Deleted Recovery Partition Unallocated space.
To extend drive C simply right-click the partition and select Extend Volume.
This will open the Extend Volume Wizard. Click Next
Then Select the amount of unallocated space you want to add to the C drive. In my case I want to move all the unallocated space to C.
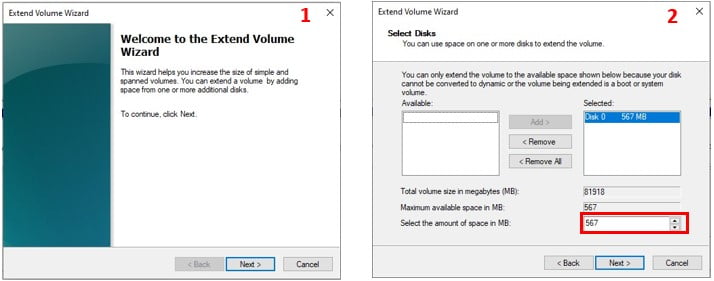
Click Next and then Finish to close the wizard
Drive C now has more space acquired from the deleted recovery partition as shown below.