How to use the DS18B20 Waterproof Temperature Sensor with Arduino.
The DS18B20 waterproof temperature sensor is preferred in situations where you want to measure temperature of liquids or substances in wet conditions or at a far distance from where the control device is. You can check out other common temperature sensors from my previous posts:
- LM35 Temperature sensor
- DHT11 Temperature and Humidity sensor.
- BME Temperature, Humidity and Pressure sensor.
DS18B20 Waterproof Temperature sensor description.
The DS18B20 temperature sensor provides 9 to 12-bit temperature readings over a 1-Wire interface. This means that you need only one signal wire to connect this sensor to a microcontroller. Because they are digital, you don’t get any signal degradation even over long distances!
It can measure temperatures from -55°C to +125°C with ±0.5°C accuracy and can be powered by 3.0 to 5.5V power supply. The sensor cable is jacketed in PVC so it would be wise to keep it under 100°C.
You can buy the DS182B0 waterproof temperature sensor from this recommended link:
- DS18B20 Waterproof Temperature Sensor:………………….. Amazon
Disclosure: This is an affiliate link. I earn a commission as an Amazon Associate for qualifying purchases. I would appreciate your support in this way.
Connecting the DS18B20 waterproof temperature sensor to Arduino.
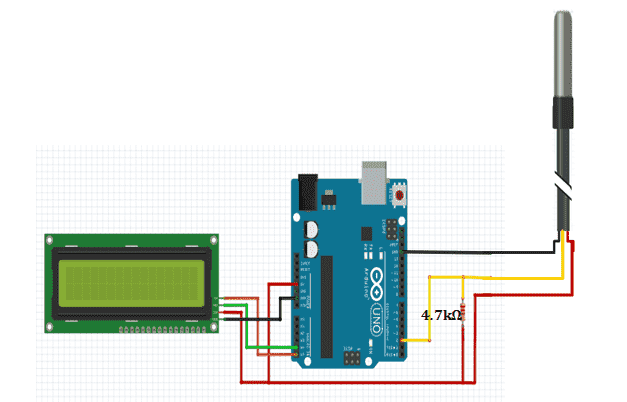
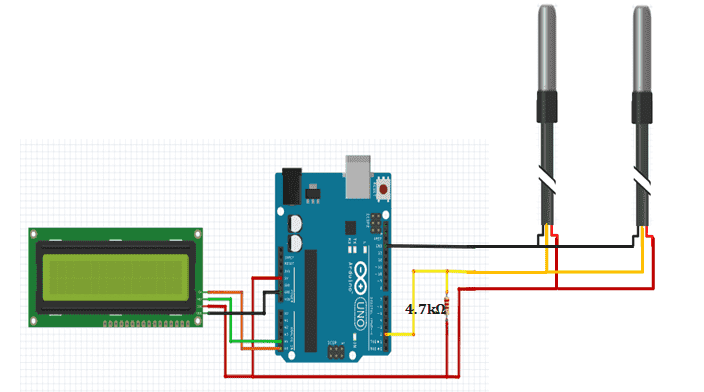
The Red wire is connected to 5V, Black connects to ground and Yellow goes to digital pin 2 on Arduino. A 4.7K pullup resistor from the data wire to 5V is very important otherwise the sensor will not work.
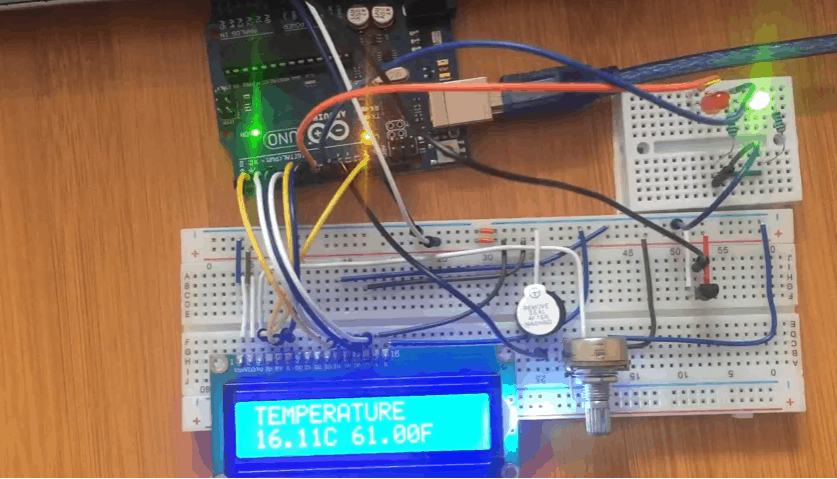
In the setup below I have included a I6X2 I2C LCD display to show the temperature values being measured on the screen.
Code for single DS18B20 sensor.
To use the DS18B20 with Arduino you need the DallasTemperature.h library that contains commands for getting temperature readings from the sensor.
We also need the OneWire library which is used for communication with any one-wire device. Both of these libraries can be got from the Arduino Library Manager.
#include <OneWire.h>
#include <DallasTemperature.h>
#include <Wire.h>
#include <LiquidCrystal_I2C.h>
LiquidCrystal_I2C lcd(0x27, 2, 1, 0, 4, 5, 6, 7, 3, POSITIVE);
// Data wire is plugged into digital pin 2 on the Arduino
#define ONE_WIRE_BUS 2
// Setup a oneWire instance to communicate with any OneWire device
OneWire oneWire(ONE_WIRE_BUS);
// Pass oneWire reference to DallasTemperature library
DallasTemperature sensors(&oneWire);
void setup(void)
{
  sensors.begin();
  lcd.begin(16,2);
  lcd.backlight();
}
void loop(void)
{
  sensors.requestTemperatures();
  lcd.setCursor(0,0);
  lcd.print("TEMP: ");
  lcd.print(sensors.getTempCByIndex(0));
  lcd.print((char)223);
  lcd.print("C");
  delay(1000);
}
Using multiple DS18B20 temperature sensors.
Each DS18B20 temperature sensor has a unique 64-bit serial code. This allows you to wire multiple sensors to the same data wire. So, you can get temperature from multiple sensors using just one Arduino digital pin.
This feature is useful in a number of applications like HVAC environmental controls, sensing temperatures inside buildings, equipment or machinery, and process monitoring and control.
In order to use multiple sensors with Arduino we need to know the serial codes for the individual sensors. This is done by uploading the code below to the Arduino after connecting the DS18B20 temperature sensors.
Code for finding the addresses of individual DS18b20 temperature sensors.
#include <OneWire.h>
#include <DallasTemperature.h>
// Data wire is plugged into port 2 on the Arduino
#define ONE_WIRE_BUS 2
// Setup a oneWire instance to communicate with any OneWire devices
OneWire oneWire(ONE_WIRE_BUS);
// Pass our oneWire reference to Dallas Temperature.
DallasTemperature sensors(&oneWire);
// variable to hold device addresses
DeviceAddress Thermometer;
int deviceCount = 0;
void setup(void)
{
  // start serial port
  Serial.begin(9600);
  // Start up the library
  sensors.begin();
  // locate devices on the bus
  Serial.println("Locating devices...");
  Serial.print("Found ");
  deviceCount = sensors.getDeviceCount();
  Serial.print(deviceCount, DEC);
  Serial.println(" devices.");
  Serial.println("");
  Serial.println("Printing addresses...");
  for (int i = 0;  i < deviceCount;  i++)
  {
    Serial.print("Sensor ");
    Serial.print(i+1);
    Serial.print(" : ");
    sensors.getAddress(Thermometer, i);
    printAddress(Thermometer);
  }
}
void loop(void)
{}
void printAddress(DeviceAddress deviceAddress)
{
  for (uint8_t i = 0; i < 8; i++)
  {
    Serial.print("0x");
    if (deviceAddress[i] < 0x10) Serial.print("0");
    Serial.print(deviceAddress[i], HEX);
    if (i < 7) Serial.print(", ");
  }
  Serial.println("");
}
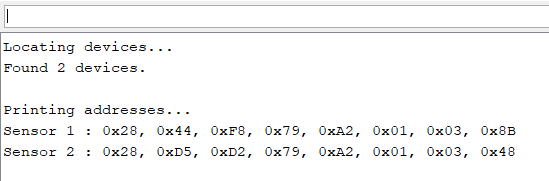
After uploading this code, we open the serial monitor where we can see the number of sensors connected and the corresponding 64-bit codes for every sensor.
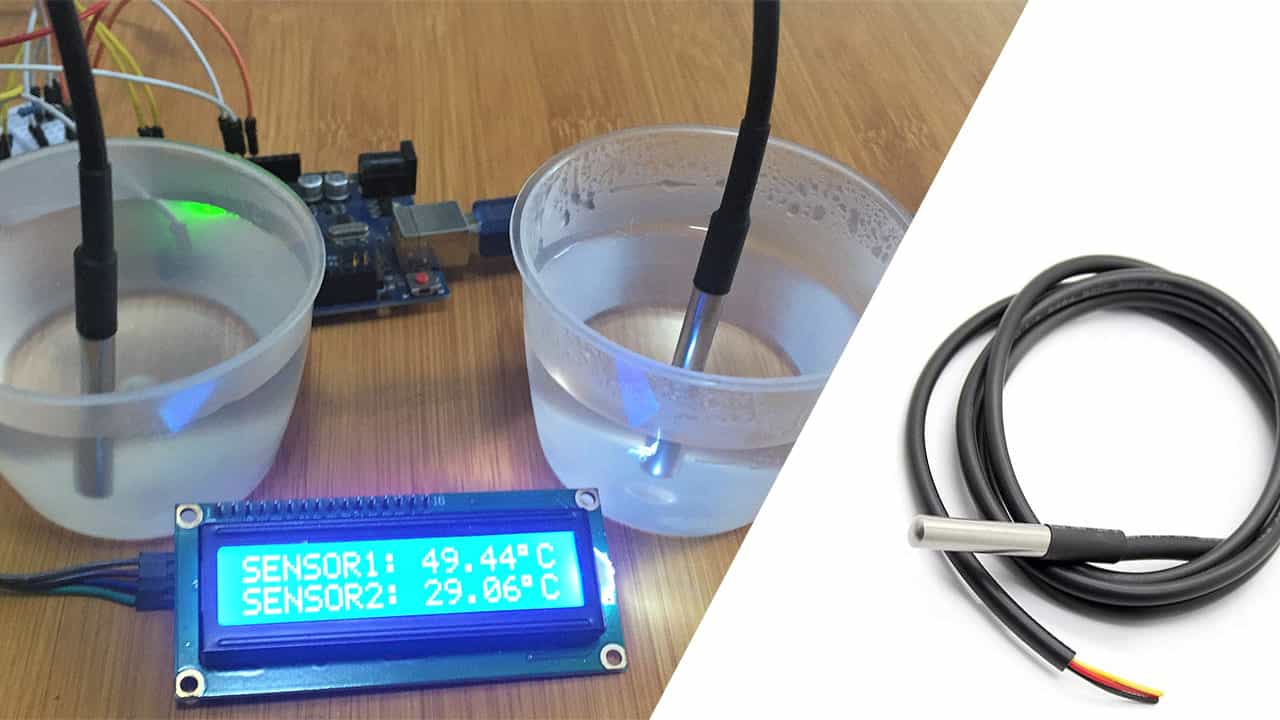
The schematic below shows how to connect two DS18B20 temperature sensors to Arduino. I have included an LCD where we can display the temperature readings for the individual sensors.
Code for using multiple DS18B20 Temperature sensors
#include <OneWire.h>
#include <DallasTemperature.h>
#include <Wire.h>
#include <LiquidCrystal_I2C.h>
LiquidCrystal_I2C lcd(0x27, 2, 1, 0, 4, 5, 6, 7, 3, POSITIVE);
// Data wire is plugged into digital pin 2 on the Arduino
#define ONE_WIRE_BUS 2
// Setup a oneWire instance to communicate with any OneWire device
OneWire oneWire(ONE_WIRE_BUS);
// Pass oneWire reference to DallasTemperature library
DallasTemperature sensors(&oneWire);
// Addresses of 2 DS18B20s
uint8_t sensor1[8] = { 0x28, 0x44, 0xF8, 0x79, 0xA2, 0x01, 0x03, 0x8B };
uint8_t sensor2[8] = { 0x28, 0xD5, 0xD2, 0x79, 0xA2, 0x01, 0x03, 0x48 };
void setup(void)
{
  sensors.begin();
  lcd.begin(16,2);
  lcd.backlight();
}
void loop(void)
{
  sensors.requestTemperatures();
  lcd.setCursor(0,0);
  lcd.print("SENSOR1: ");
  printTemperature(sensor1);
  lcd.setCursor(0,1);
  lcd.print("SENSOR2: ");
  printTemperature(sensor2);
  delay(1000);
}
  void printTemperature(DeviceAddress deviceAddress)
{
  float tempC = sensors.getTempC(deviceAddress);
  lcd.print(tempC);
  lcd.print((char)223);
  lcd.print("C");
}