The BH1750 ambient light sensor is used in areas where there is need to monitor the intensity of light for example adjusting the brightness of display in mobiles and LCD displays, street lights and for turning car headlights on or off depending on outdoor lighting.
In this tutorial I’ll demonstrate how this light sensor can be used with Arduino to monitor light intensity.
BH1750 Ambient Light sensor Hardware overview.
This sensor is based on BH1750FVI IC which is a digital Ambient Light Sensor IC with I2C bus interface made by Rohm Semiconductor.
The BH1570FVI IC contains a photodiode that detects light illuminance and a 16-bit ADC that converts the analog illuminance to a digital lux value. This data is then transferred to microcontroller via I2C interface where SCL is used to provide the clock pulse and the SDA is used to transfer the lux value.

- VCC – Power supply for the module can be 2.4V to 3.6V, typically 3.0V is used
- GND – Ground of the module, connected to ground of the circuit
- SCL – Serial Clock Line, used to provide clock pulse for I2C communication
- SDA – Serial Data Address, used to transfer the data through I2C communication
- ADDR – Device I2C address select pin. By default, the ADDR pin is LOW giving the default address as 0x23 but if the ADDR pin is pulled HIGH the device address will change to 0x5C. This feature is important when more than two modules are to be connected to a microcontroller.
The breakout board includes an on-board 3.3V regulator which makes the module compatible with 5V devices such as an Arduino.
You also don’t need to worry about adding pull-up resistors on the I2C lines since they already have on-board 4.7kΩ pull-up resistors connected to the 3.3V output of the on-board voltage regulator.
Th BH1570 light sensor is preferred to other light dependent resistors (LDR) because unlike LDRs which give analog signals that have to be converted to the required data, the BH1570 sensor directly outputs a digital value in lux (lx) over a range of 1 – 65535 lx without complicated calculations.
What is Lux?
Lux is a measure of illuminance which is the total amount of light that falls on a surface. The closer the surface is to the light source, the higher the lux reading. This is due to the dispersion of light as one moves away from the light source.
BH1750 Measurement modes.
Measurement can be divided into;
- Continuous measurement mode where the sensor continuously measures illuminance value.
- One-time measurement mode where the sensor makes only one measurement and then goes into Power Down mode.
Each of the above modes of measurement has three different precision levels which are;
- Low Resolution Mode – (4 lx precision, 16ms measurement time)
- High Resolution Mode – (1 lx precision, 120ms measurement time)
- High Resolution Mode 2 – (0.5 lx precision, 120ms measurement time)
It is recommended to use High Resolution Mode because the measurement time is long which caters for noise and is also suitable for detecting darkness.
Connecting BH1750 Ambient Light sensor to Arduino.
Since BH1750 light sensor uses I2C communication, connecting it to Arduino is quite simple. You only need to connect the SCL and SDA pins to the corresponding I2C pins of Arduino. For Arduino UNO the I2C pins are A5 for SCL and A4 for SDA.
Make sure you use the correct 12C pins if you are using a different Arduino board.

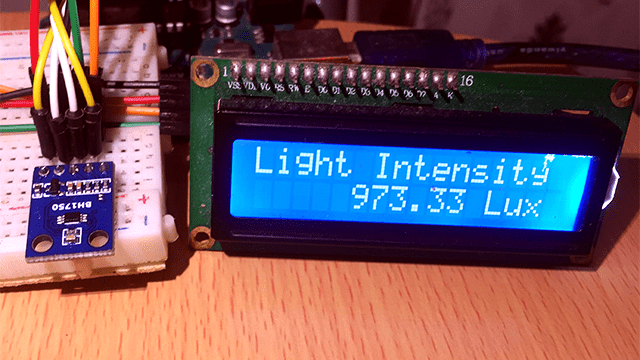
I have also included a 16×2 I2C LCD where the value of the measured light illuminance will be displayed.
Code for BH1750 light sensor with Arduino.
You need to first install BH1750.h library which contains the necessary functions for reading and outputting the lux values from the light sensor.
#include <BH1750.h>
#include <Wire.h> // Library for I2C communication
#include <LiquidCrystal_I2C.h> // Library for LCD

BH1750 lightMeter;
LiquidCrystal_I2C lcd = LiquidCrystal_I2C(0x27, 16, 2);

void setup() {
  Wire.begin();
  lightMeter.begin();
  lcd.begin();
  lcd.backlight();
  lcd.setCursor(0,0);
  lcd.print("BH1750 Test");
  lcd.setCursor(0,1);
  lcd.print("Please wait...");
  delay(3000);
  lcd.clear();
}
void loop() {
   lcd.clear();
   lcd.setCursor(0, 0);
   lcd.print("Light Intensity ");
   lcd.setCursor(5, 1);
   float lux = lightMeter.readLightLevel();
   lcd.print(lux);
   lcd.print(" Lux");
   delay(2000);
}
Code description.
First include the BH1750.h library for controlling the light sensor, the Wire.h library is for I2C communication and the LiquidCrystal_I2C.h library is for the 16×2 I2C LCD.
Then create an object from the BH1750 class which is named ‘lightMeter’.
In the setup() section we initialize I2C communication, the sensor and LCD by invoking the Wire.begin(), lightMeter.begin() and lcd.begin() functions respectively.
The loop() section uses the readLightLevel() function to return a float value for lux and this value is displayed on the LCD.
By default, the BH1750.h library uses Continuous High-Resolution Mode, but you can change this to a different mode by passing the mode argument to BH1750.begin() method. For example, if you want to use one-shot high-resolution mode then you would write;
lightMeter.begin(BH1750::ONE_TIME_HIGH_RES_MODE);
For continuous mode high resolution mode 2 you use; lightMeter.begin(BH1750::ONE_TIME_HIGH_RES_MODE_2);
Normally, the sensor reverts to the default mode after a data is sent using one shot mode. However, the library automatically uses the same mode even if the previous mode is one shot.


