How to Add a Custom Widget Area to a WordPress theme.
Widgets are blocks of content that make it easy to add specific features to different areas of a website. Most WordPress themes come with a sidebar and footer where you can be able to add, remove, and re-order features using the “widget” section of your WordPress dashboard.
Widgets are normally used to create space for newsletter subscription, advertisement, forms and other features to the website footer, sidebar, header or any other section depending on your website layout. In this tutorial I will show you how to create your own widget areas.
Registering Your Custom Widget area in functions.php
The first step is to add code similar to the one below to the functions.php file of your theme. This code is for registering the widget using the register_sidebar() function. This block of code can be placed within a similar function used for registering widgets if the theme already has that function otherwise you can just place it at the end of the file.
function register_custom_widget_area() {
     register_sidebar(
         array(
                'id' => 'custom-widget-area',
                'name' => esc_html__( 'Footer widget area', 'codefortheweb-theme' ),
                'description' => esc_html__( 'New widget area made for        website footer', 'codefortheweb-theme' ),
                'before_widget' => '<div id="%1$s" class="widget %2$s">',
                'after_widget' => '</div>',
                'before_title' => '<div class="widget-title-holder"><h3 class="widget-title">',
                'after_title' => '</h3></div>'
         )
      );
}
add_action( 'widgets_init', 'register_custom_widget_area' );
The register_sidebar() function takes on a number of arguments for the widget area being registered. The common arguments include:
- id – a unique identifier of the widget area
- name – the name of the widget area, which will be displayed in the WordPress dashboard
- description – a description of the widget area that is also displayed in WordPress dashboard
- class – additional CSS class that can be assigned to the widget area, which will help you customize the widget area with CSS later
- before_widget – a block of HTML code added before every widget that belongs to the widget area
- after_widget – a block of HTML code added after every widget that belongs to the widget area
- before_title – a block of HTML code added before the widget area title when it is displayed
- after_title – a block of HTML code added after the widget area title when it is displayed
Showing the custom widget area in WordPress dashboard.
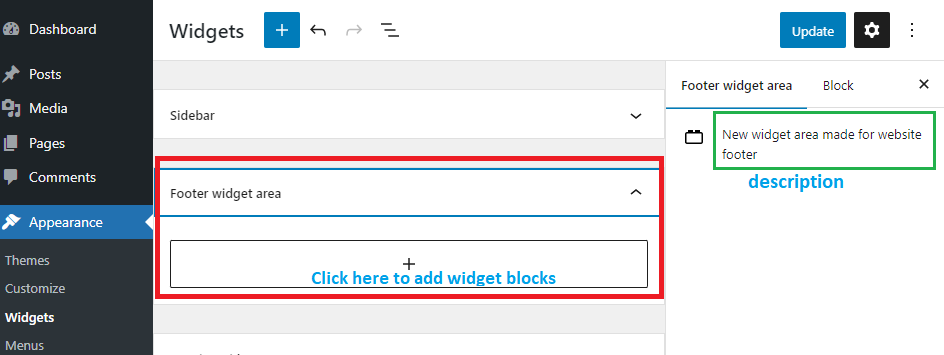
After properly registering the widget area in the functions.php file of your theme using the code given above, you can now be able to see the new widget area in your WordPress dashboard when you go to Appearances>Widgets.
In my case, I registered the Footer widget area and the name and description of this widget area will appear in the dashboard as shown bellow.
Inserting the widgets inside the widget area
You can now drag and drop widgets inside the newly created widget area by clicking on the “+” sign. For demonstration, I will add Latest Posts, Custom HTML and Categories List widgets to the Footer widget area.

Showing the widget area on the website
Even after registering the widget area and placing the necessary widgets, it still won’t automatically appear on your site until you add some code to “call” that specific widget area that you created. The code you need to insert is similar to this one:
<?php if ( is_active_sidebar( 'custom-widget-area' ) ) : ?>
<div id="secondary-sidebar" class="new-widget-area">
<?php dynamic_sidebar( 'custom-widget-area' ); ?>
</div>
<?php endif; ?>
This code should be placed inside one of your theme’s template files depending on where you want your new widget area to show. For example I will place this code in the footer.php file.
The dynamic_sidebar() function is the one responsible for showing the widget area and takes on parameters of a registered name or id of a widget.
The is_active_sidebar() is a conditional tag used to make sure the widget area is only shown if it has widgets inserted.
You may also wrap the widget area with div tags and even add ids and classes. This makes the widget area more structured and is useful when you want to add CSS styles later.
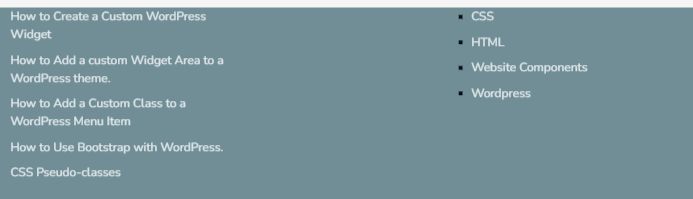
After adding the code above the footer will appear as shown below with the latest posts and categories lists.
The widget content is shown as simple HTML output. To make the widget area appear more attractive, you need to add CSS styles.
Styling the created widget areas using CSS
The widget area needs to be styled using CSS to adjust various settings like the paddings or margins, text alignment, background color and other aspects depending on your theme’s layout.
This is where wrapping the widget area code with div tags with a certain custom class or id is useful. It makes it easier to find suitable CSS selectors for styling the widget area. Using the example code given earlier, the CSS selectors to use can start with either #secondary-sidebar or .custom-widget-area
You can use the browser inspection tool to access the id and class you will use for styling. For example the code structure for the widget area I created can be seen using the Chrome Inspector tool.
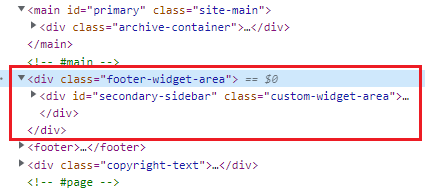
Then using the .footer-widget-area and .custom-widget-area classes, I can now use the CSS code below to style the Footer widget area
/*============================================================
                      Custom footer Widget styling
==============================================================*/
.custom-widget-area{
  width: 90%;
  display: grid;
  grid-template-columns: 1fr 1fr 1fr;
  margin: 10px auto 0;
}
.custom-widget-area .widget-title-holder{
  font-size: 20px;
}
.custom-widget-area ul{
   list-style-type: square;
   margin: 0;
}
.custom-widget-area ul li{
   margin-bottom: 10px;
}
.custom-widget-area ul li a{
   color: #E5ECEE
}
.footer-widget-area{
  background: #718E96;
}
@media(max-width: 600px ){
  .custom-widget-area{
   grid-template-columns: 1fr;
}

}
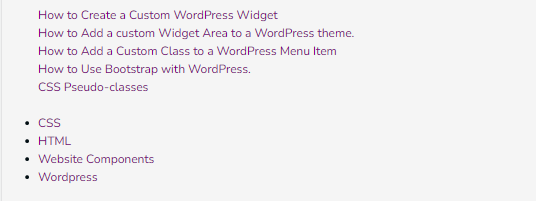
After applying the above CSS styling the footer widget area will appear as shown below.