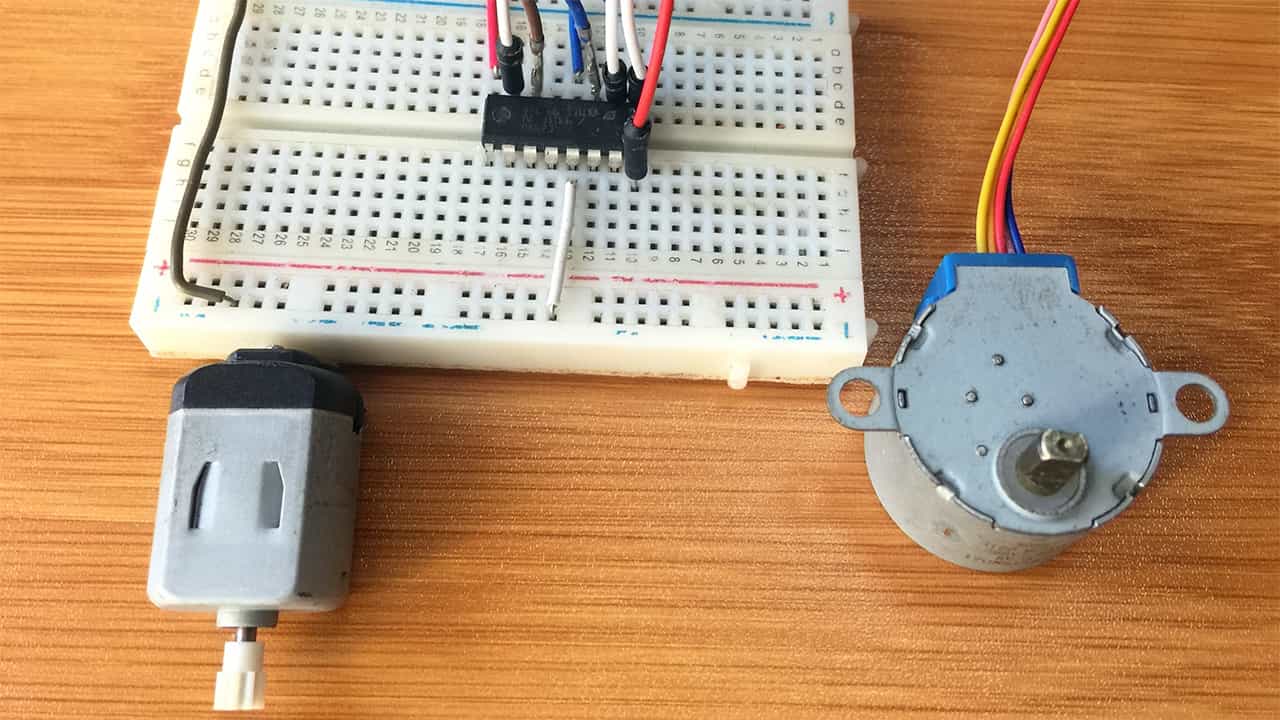
The L293D motor driver IC is one of the cheap and easily available devices for controlling the speed and direction of rotation of DC and stepper motors. In this tutorial I will show you how to use this motor driver with Arduino in controlling a simple DC motor and a 28BYJ-48 unipolar stepper motor.
The L293D Motor Driver IC Overview.
This motor driver comes as a 16-pin DIP IC package containing two H-bridge circuits therefore can control two DC motors at once or one stepper motor. The diagram below shows the pin out of this motor driver.

There are two power supply pins, VCC1 and VCC2.
VCC1: is the power supply for the IC circuitry and should be 5V. It is connected with the Arduino 5V.
VCC2: is the power supply for the H-Bridge circuits for running the motors and is in the range 4.5V to 36V.
GND: is the common ground and heat sink.
OUT1 and OUT2 are the output terminals for motor A while OUT3 and OUT4 are output terminals for motor B. This is where the DC motors having voltages between 4.5 to 36V are connected. Each channel on the IC can deliver up to 600mA to the DC motor but the amount of current supplied to the motor depends on system’s power supply.
ENA and ENB are the speed control pins for motor A and B respectively. When these pins get a HIGH signal the motors will rotate and when they are LOW the motors stop moving. However the speed of rotation is better controlled using PWM signals.
IN1, IN2, IN3 and IN4 pins are for controlling the direction of rotation of the motors. The direction of rotation is determined by the logic on these pins.
How the L293D Motor Driver Works.
Motor speed control using PWM.
PWM enables us to control the voltage applied to the motor in form of square wave pulses with a certain frequency. The voltage applied to the motor determines the speed of rotation of the motor by varying the width of this square wave called a duty cycle. The duty cycle is given in percentage and the higher the duty cycle, the higher the voltage across the motor which also increases the speed of rotation.
When the duty cycle is 100%, the pulse is constantly HIGH and the motor receives full power and spins at its rated output speed while a duty cycle of 0% means the pulse signal is constantly LOW therefore no voltage across the motor and the motor will stop rotating.
I have a post with a more detailed explanation of how the PWM technique is used with Arduino which you can refer to using the link below.
Direction of Rotation control using H-Bridge.
The direction of rotation of a motor is determined by the direction of flow of current through the motor. This is achieved using an H-bridge circuit which is used for switching the polarity of a voltage applied to a load like a motor in this case.
How an H-Bridge works.
An H-Bridge consists of four MOSFETs or Transistors wired as switches. When two of these switches are activated at the same time in a particular format, the direction of flow of current is changed which then changes the direction of rotation of the motor. You can refer to the diagram below to see how the H-Bridge works.

When switches S1 and S4 are closed the current will flow from left to right through the motor which makes the motor rotate in a particular direction, in this case clockwise. Likewise if switches S2 and S3 are closed, current will flow from right to left and the motor rotates in the opposite direction.
Do not switch on S1 and S2 together or S3 and S4 together. This condition is called shoot-through and can damage the MOSFETs or transistors.
The L293D motor driver module has two H-Bridge circuits and therefore can control two dc motors simultaneously. The pins IN1, IN2, IN3 and IN4 are actually for controlling the switches of the H-bridge circuit of the L293D module.
If IN1 is LOW and IN2 is HIGH then motor A will rotate in a particular direction and if IN1 is HIGH and IN2 is LOW then the motor rotates in the opposite direction. If all the inputs have the same signal, say IN1 and IN2 are both LOW and both HIGH then the motor will stop rotating.
The table below shows how the direction of rotation of motor A and B changes depending on the state of the input pins IN1, IN2, IN3 and IN4.

DC motor control using the L293D motor driver and Arduino.
The two DC motors are going to be connected to the motor driver as shown in the schematic below. Since I am using simple motors rated at about 3 to 9V, the VCC2 pin is going to be connected to an external 9V power supply. The VCC1 pin will be connected to Arduino 5V. All the grounds in the circuit should be connected.

The enable pins ENA and ENB should be connected to PWM enabled pins of the Arduino like in this case pin 3 and 6.
Input pins IN1, IN2, IN3 and IN4 are connected to any other digital output pins like pins 4,5,7 and 8 respectively.
One motor is connected across OUT1 and OUT2 and the second motor is connected across OUT3 and OUT4.
Code for controlling a DC motor.
The code below is for controlling a single DC motor. This means the motor uses only one side of the L293D motor driver, that is, ENA, IN1 IN2, OUT1 and OUT2. No libraries are required to control the motor using Arduino.
// Motor A connections
int enA = 3;
int in1 = 4;
int in2 = 5;

void setup() {
  // Set all the motor control pins to outputs
  pinMode(enA, OUTPUT);
  pinMode(in1, OUTPUT);
  pinMode(in2, OUTPUT);z

  // Turn off motor - Initial state
  digitalWrite(in1, LOW);
  digitalWrite(in2, LOW);
}

void loop() {
  directionControl();
  delay(1000);
  speedControl();
  delay(1000);
}

void directionControl() {
  analogWrite(enA, 200); // Set motor speed (PWM values are 0 to 255)
  // Turn on motor A
  digitalWrite(in1, HIGH);
  digitalWrite(in2, LOW);
  delay(2000);

  // Now change motor directions
  digitalWrite(in1, LOW);
  digitalWrite(in2, HIGH);
  delay(2000);

  // Turn off motors
  digitalWrite(in1, LOW);
  digitalWrite(in2, LOW);
}

void speedControl() {
  // Turn on motors
  digitalWrite(in1, LOW);
  digitalWrite(in2, HIGH);

  // Accelerate from zero to maximum speed
  for (int i = 0; i < 255; i++) {
    analogWrite(enA, i);
    delay(20);
  }

  // Decelerate from maximum speed to zero
  for (int i = 255; i >= 0; --i) {
    analogWrite(enA, i);
    delay(20);
  }

  // Now turn off motors
  digitalWrite(in1, LOW);
  digitalWrite(in2, LOW);
}
Code description
The major area worth noting in the code is in the loop section where we use two user defined functions;directionControl(): This function spins the motor in a specific direction at a given speed for two seconds and then reverses the motor’s spinning direction for another two seconds and finally turns the motors off.
speedControl(): This function accelerates the motor from zero to maximum speed and then decelerates it back to zero. The speed of rotation is controlled by PWM signals using the analogWrite() function.
Controlling a stepper motor using the L293D Motor Driver.
A stepper motor can be connected to the L293D motor driver by using the two H-Bridge circuits in the driver where each of these H-bridges controls one of the electromagnetic coils of the stepper motor. The diagram below shows how the stepper motor is connected to the H-Bridges.

The direction of rotation of the stepper motor will depend on the sequence in which the electromagnetic coils of the motor are energized and the speed of rotation is determined by how frequent these coils are energized.
There are different types of stepper motors although in this case am going to use the 28BYJ-48 unipolar stepper motor.
Connecting the 28BYJ-48 Stepper Motor with L293D motor driver and Arduino.
The motor is going to be connected as shown in the schematic below. This motor has five wires although four wires are used to connect the coils to the L293D driver, that is, A+ (Orange), A- (Pink), B- (Yellow) and B+ (Blue). They are connected to output pins OUT4, OUT3, OUT2 and OUT1 respectively.

Both the ENA and ENB pins are connected to 5V output so that the motor is always enabled. The input pins IN1, IN2, IN3 and IN4 of the L293D IC are connected to four digital output pins 8, 10, 9 and 11 of the Arduino.
Code for controlling the Stepper motor.
We shall use Stepper.h library is to control the motor.
#include <Stepper.h>

const int stepsPerRevolution = 2048; // Number of steps per output rotation

// Create Instance of Stepper library
Stepper myStepper(stepsPerRevolution, 8, 10, 9, 11); //blue,yellow,pink,orange

void setup(){
  myStepper.setSpeed(8); // set the speed at 8 rpm
  Serial.begin(9600); // initialize the serial port
}

void loop(){
  // step one revolution in one direction:
  Serial.println("clockwise");
  myStepper.step(stepsPerRevolution);
  delay(1000);

  // step one revolution in the other direction:
  Serial.println("counterclockwise");
  myStepper.step(-stepsPerRevolution);
  delay(1000);
}
Sometimes you may need to use more than one of these motor drivers for example in robotics projects. Then you need a motor driver shield like the L293D motor driver shield for Arduino that I have written about in another tutorial which you can check out using the link below.


