Fingerprint Door Lock using R307 Fingerprint Sensor and Arduino.
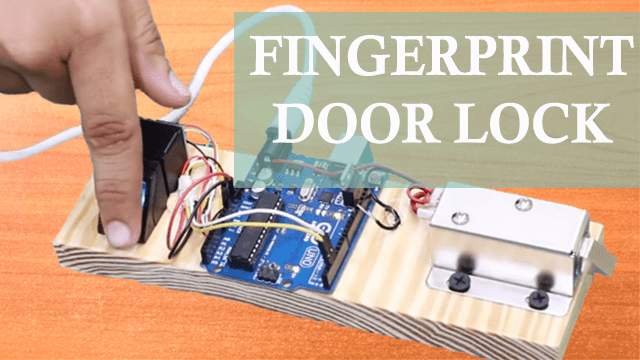
Door locks using keys have posed a number of security disadvantages since keys can easily be misplaced or duplicated and as such more advanced security systems have been developed basing on passwords, RFID and biometric signatures like fingerprints.
I have already made projects on door lock systems with Arduino using passwords and RFID which you can also check out using the links below;
In this tutorial am going to show you how a fingerprint door lock can be made using Arduino and the R307 fingerprint sensor.
R307 Fingerprint sensor.
This is the main component in this project and it is an Optical Fingerprint Scanner.
R307 fingerprint sensor has 6 wires used for connection to microcontrollers via UART supporting baud rates of up to 115200 bps. There is also a USB interface for use when you want to directly connect the scanner to a computer.
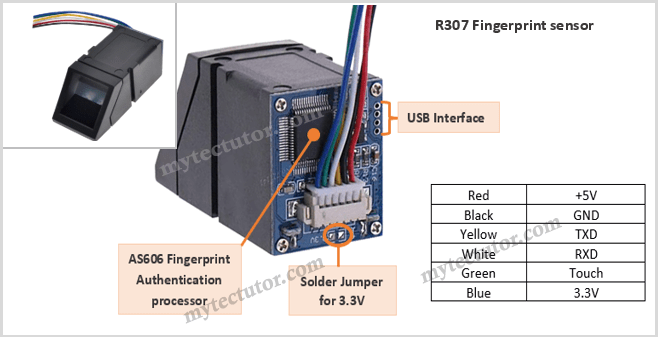
The colors of the wires may vary depending on the manufacturer but the order of the outputs is the same.
The scanner can be powered by both 3.3V and 5V supplies because there is a 3.3V regulator. The fingerprint scanner circuit uses 3.3V and therefore if you provide 5V, it goes through the regulator.
When you want to power the scanner from 5V and interface with a 5V microcontroller, supply the power to pins 1 and 6, and disconnect the 3.3V jumper. If you want to supply 3.3V and interface the scanner with a 3.3V microcontroller such as Arduino Due, supply the power to pins 1 and 6 and solder the 3.3V jumper.
Be careful when powering the fingerprint sensor since improper voltages and configurations can damage the sensor.
This sensor is based on the AS606 Fingerprint authentication processor chip from Synochip. The chip features 16Kb ROM, 128Kb SRAM and 1MB Flash memory. It is capable of storing 512 fingerprint templates and supports USB and UART interfaces with hardware encryption and decryption functions.
Pin 6 (Touch Sense Power) is the supply voltage for the finger detection circuit. When a finger is present on the scanner, the output of pin 5 (Touch Sense) will be high. This signal can be used to initiate the scanning of the finger manually. Otherwise, the scanner will wait for some time to detect the finger.
Connecting R307 Fingerprint sensor to Arduino
To connect the R307 fingerprint sensor to Arduino, you only need 4 wires, that is, 5V , GND, Rx and Tx as shown below.
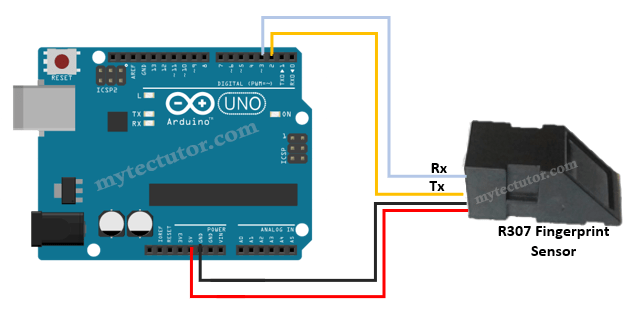
We will be using software serial connection therefore the Tx and Rx wires of the sensor will be connected to digital pins 2 and 3 of Arduino respectively.
Installing the Adafruit Fingerprint Sensor library.
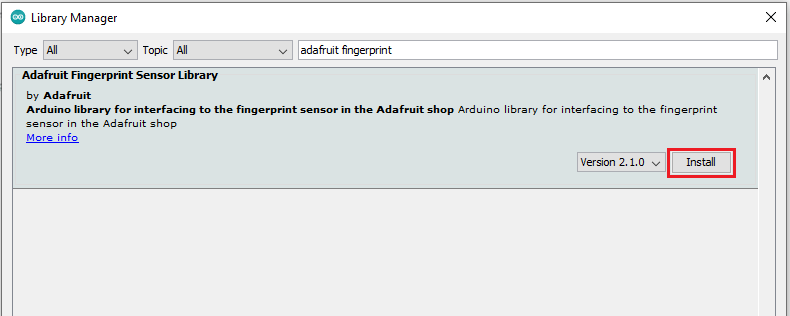
Before using the Fingerprint sensor with Arduino you need to install the necessary library. The Fingerprint Sensor Library from Adafruit is one of the best to use with a number of these sensors and is the one I will be using.
Within the Arduino IDE, go to Tools > Manage Libraries to open the Library Manager and search for “Adafruit Fingerprint”, then select and install the library:
Enrolling fingerprints
Enrolling a fingerprint involves adding a new fingerprint into the on-board memory of the fingerprint sensor.
First load up the Enroll example by going to File > Examples > Adafruit Fingerprint Sensor Library > enroll
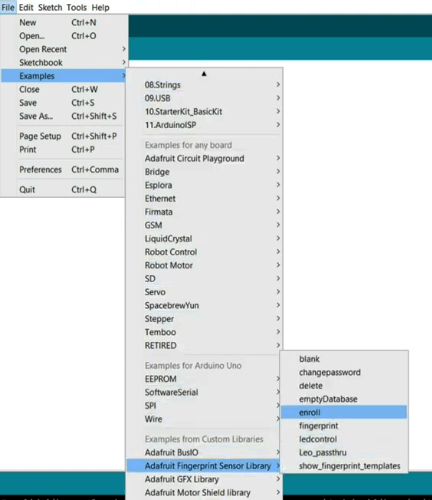
Upload the “enroll” example code sketch to your Arduino board and open the serial monitor.
The way this code works is as follows;
- First, it will attempt to find the fingerprint sensor and If successful, the main loop will be started.
- The program will then prompt for an ID of the finger you want to add. The ID should be from 1 to 127.
- Type any ID and press Enter. The program will wait for a finger to be placed on the scanner
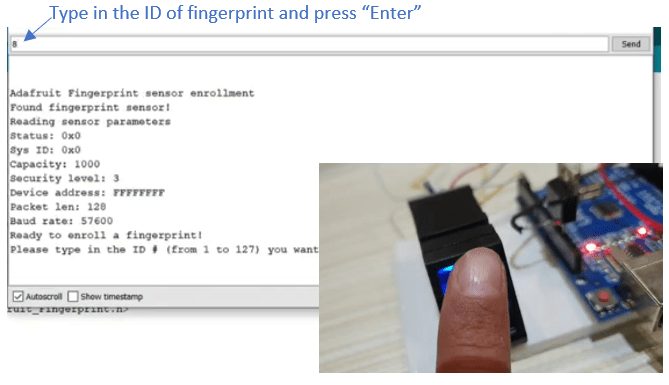
4. Place the finger whose fingerprint you want to store over the scanner and once a finger is detected, an image of the fingerprint will be taken and do a couple of checks to ensure it is valid. You will be prompted again to re-place the finger on the scanner and do the same checks to verify that the images are similar.
5. The fingerprint will then be stored in the sensor’s on-board memory and the loop is restarted. The process will look like shown below in the serial monitor.
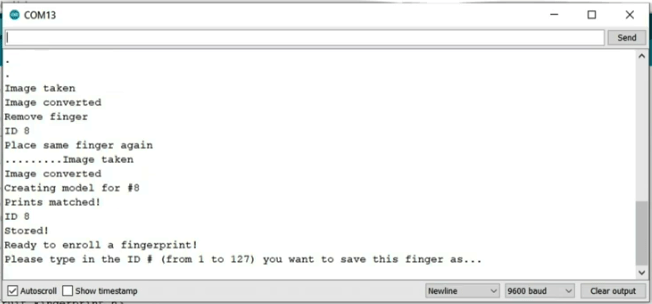
You can enroll fingerprints with IDs from 1 to 127 because that is the capacity of the on board memory of this fingerprint sensor.
Checking the enrolled Fingerprints.
To verify the fingerprints that have been stored by the sensor you use the fingerprint example code sketch which is accessed by going to File > examples > Adafruit Fingerprint Sensor Library > fingerprint.
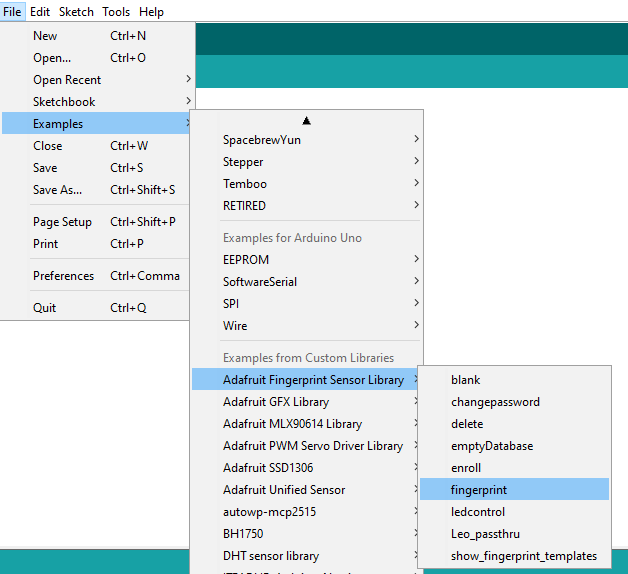
This code sketch simply waits for a fingerprint to be placed on the scanner, then takes an image and checks it against all known fingerprints in the sensor’s memory. If it matches, it returns a successful match as well as a confidence score as demonstrated below;
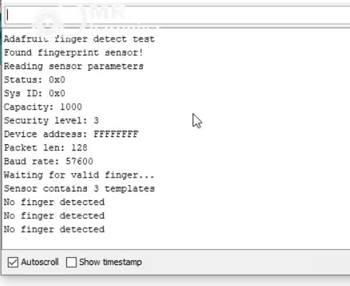
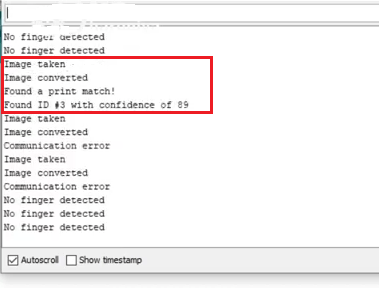
After enrolling and verifying the fingerprints, you can now be able to use this sensor in a number of applications involving authentication using fingerprints for example in a fingerprint door lock.
Fingerprint Door Lock using R307 fingerprint sensor, 12v solenoid lock and Arduino.
The setup for for the fingerprint door lock using a 12V solenoid lock, R307 fingerprint sensor and Arduino is as shown below.
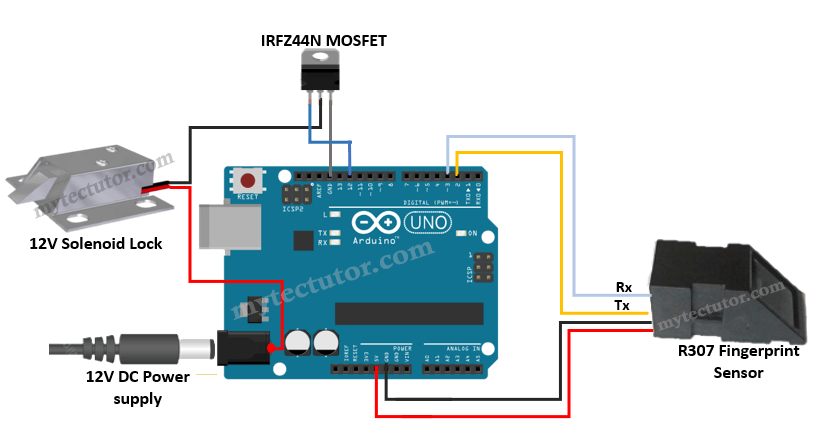
Since Arduino uses a voltage of 5V and the solenoid lock uses 12V, you cannot directly power the solenoid lock from the Arduino board. That is why I have included IRFZ44N MOSFET to enable using the 12V lock with Arduino.
The IRFZ44N is an n-channel enhancement mode power MOSFET ideal to use in applications where high speed switching is a crucial requirement. It is capable of driving loads of up to 49A and the max load voltage can be 55V and peak pulse current of up to 160A. The minimum threshold voltage required for this transistor to make it in fully open state is 2V to 4V and it is widely used with microcontrollers in place of a relay.
The IRFZ44N MOSFET has three pins namely, Gate, Drain and Source which are connected to Arduino digital pin 12, the ground of 12V solenoid lock and Arduino GND respectively.
The solenoid lock is powered directly from 12V DC power supply that is why it is connected to the Arduino power jack before the 12V is regulated to 5V that is used by Arduino UNO.
How does a Fingerprint door lock work?
Biometric systems like fingerprint locks use the concept of algorithm matching which involves comparison of previously stored images of fingerprints against a current user’s fingerprints for authentication purposes.
In this case the fingerprints are first stored using a fingerprint sensor and whenever someone wants to open the lock, they place their fingerprint on the sensor and the sensor compares that finger print with the ones stored in its memory. If the fingerprints match, the lock will open otherwise it will stay locked.
Code for Fingerprint Door lock using Arduino and R307 Fingerprint sensor.
The code is the same as the fingerprint example we used earlier apart from a few adjustments for controlling the solenoid lock.
#include <Adafruit_Fingerprint.h>
#include <SoftwareSerial.h>
#include <stdint.h>

int getFingerprintIDez();

//Declare Pin Connections
int pinRelay = 12;
int pinFPS = 8;

//Declare Counter
int count = 0;

// pin #2 is IN from sensor (GREEN wire)
// pin #3 is OUT from arduino  (WHITE wire)
SoftwareSerial mySerial(2, 3);


Adafruit_Fingerprint finger = Adafruit_Fingerprint(&mySerial);

void setup()
{
  Serial.begin(9600);
  Serial.println("finger test");

  pinMode(pinRelay, OUTPUT);
  pinMode(pinFPS, OUTPUT);

  // set the data rate for the sensor serial port
  finger.begin(57600);
  delay(5);
  if (finger.verifyPassword()) {
    Serial.println("Found fingerprint sensor!");
  } else {
    Serial.println("Did not find fingerprint sensor :(");
    while (1) { delay(1); }
  }

}

void loop()                     // run over and over again
{
  getFingerprintIDez();
  delay(50);            //FPS internal LED blink speed.

  //use serial to display information of the counter setup
  Serial.print("Awake for ");
  Serial.print(count);
  Serial.println("sec ");
  count++;
  delay(1000);

  //read serial data amd start count function
  if(Serial.available()){
    int serialData = Serial.read(); //declare
    if(serialData == 'Serial') //takes value from serial
    {
      Serial.println("Serial: No finger detected"); //count trigger message
      delay(100); //this delay is required to avoid serial message error
      count = 0;
      }
    }
   //check for confirm sleep
   if(count>= 10){
    Serial.println(FPS in sleep mode);
    delay(100);
    count = 0;
    digitalWrite(pinFPS, LOW);
    }
}

uint8_t getFingerprintID() {
  uint8_t p = finger.getImage();
  switch (p) {
    case FINGERPRINT_OK:
      Serial.println("Image taken");
      break;
    case FINGERPRINT_NOFINGER:
      Serial.println("No finger detected");
      return p;
    case FINGERPRINT_PACKETRECIEVEERR:
      Serial.println("Communication error");
      return p;
    case FINGERPRINT_IMAGEFAIL:
      Serial.println("Imaging error");
      return p;
    default:
      Serial.println("Unknown error");
      return p;
  }

  // OK success!
   p = finger.image2Tz();
  switch (p) {
    case FINGERPRINT_OK:
      Serial.println("Image converted");
      break;
    case FINGERPRINT_IMAGEMESS:
      Serial.println("Image too messy");
      return p;
    case FINGERPRINT_PACKETRECIEVEERR:
      Serial.println("Communication error");
      return p;
    case FINGERPRINT_FEATUREFAIL:
      Serial.println("Could not find fingerprint features");
      return p;
    case FINGERPRINT_INVALIDIMAGE:
      Serial.println("Could not find fingerprint features");
      return p;
    default:
      Serial.println("Unknown error");
      return p;
  }

  // OK converted!
  p = finger.fingerSearch();
  if (p == FINGERPRINT_OK) {
    Serial.println("Found a print match!");
  } else if (p == FINGERPRINT_PACKETRECIEVEERR) {
    Serial.println("Communication error");
    return p;
  } else if (p == FINGERPRINT_NOTFOUND) {
    Serial.println("Did not find a match");
    return p;
  } else {
    Serial.println("Unknown error");
    return p;
  }

  // found a match!
  Serial.print("Found ID #"); Serial.print(finger.fingerID);
  Serial.print(" with confidence of "); Serial.println(finger.confidence);

  return finger.fingerID;
}

// returns -1 if failed, otherwise returns ID #
int getFingerprintIDez() {
  uint8_t p = finger.getImage();
  if (p != FINGERPRINT_OK)  return -1;

  p = finger.image2Tz();
  if (p != FINGERPRINT_OK)  return -1;

  p = finger.fingerFastSearch();
  if (p != FINGERPRINT_OK)  return -1;

  // found a match!
  Serial.print("Found ID #"); Serial.print(finger.fingerID);
  Serial.print(" with confidence of "); Serial.println(finger.confidence);
  return finger.fingerID;
}
If you are not very comfortable with the use of a MOSFET and soldering the solenoid lock to the power jack of the Arduino board you can use a 5V relay module instead and the setup will be as shown below.
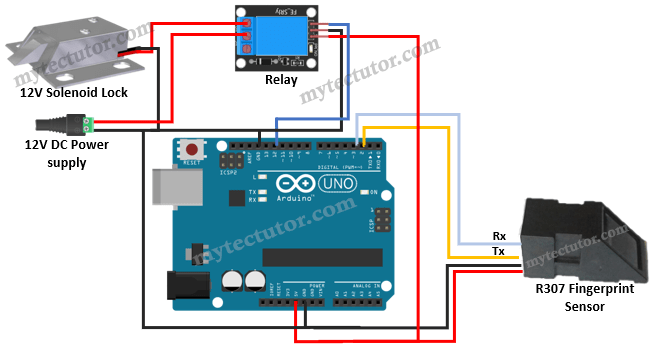
The code for the fingerprint door lock involving a relay is given below.
#include <Adafruit_Fingerprint.h>
#include <SoftwareSerial.h>

SoftwareSerial mySerial(2, 3);

Adafruit_Fingerprint finger = Adafruit_Fingerprint(&mySerial);

#define RELAY_PIN       12
#define ACCESS_DELAY    3000 // Keep lock unlocked for 3 seconds

void setup(){
  // set the data rate for the sensor serial port
  finger.begin(57600);
  delay(5);
  if (finger.verifyPassword())
  {

  }
  else
  {
    while (1) { delay(1); }
  }
  pinMode(RELAY_PIN, OUTPUT);
  digitalWrite(RELAY_PIN, HIGH);   //Switch off relay initially. Relay is LOW level triggered relay so we need to write HIGH.
}

void loop(){
  if ( getFingerPrint() != -1)
  {
    digitalWrite(RELAY_PIN, LOW);
    delay(ACCESS_DELAY);
    digitalWrite(RELAY_PIN, HIGH);
  }

  delay(50);            //Add some delay before next scan.
}

// returns -1 if failed, otherwise returns ID #
int getFingerPrint(){
  int p = finger.getImage();
  if (p != FINGERPRINT_OK)  return -1;
  p = finger.image2Tz();
  if (p != FINGERPRINT_OK)  return -1;
  p = finger.fingerFastSearch();
  if (p != FINGERPRINT_OK)  return -1;
  // found a match!
  return finger.fingerID;
}
Hope you can now be able to us the R307 fingerprint sensor in a number of applications for security locks and attendance systems.

