How to Create Tables using HTML.
Tables are very useful for displaying information on a web page in rows and columns. In the early days of web development tables were used for website layout design but in modern web development and design table-based layouts are considered obsolete and should never be used. Instead, we use CSS for creating layouts.
In this tutorial I’ll look at how to create tables using a number of HTML tags and attributes.
The HTML <table> tag.
To create a table on a web page, we use HTML <table> element and this contains a number of other elements used to define the table rows and columns as I will be explaining as we go on.
General Structure of HTML Table.
For the table to appear on a webpage, the <table> element must have other nested tags for rows and cell data and these are. I’ll use the diagram below to illustrate the structure of a table in HTML
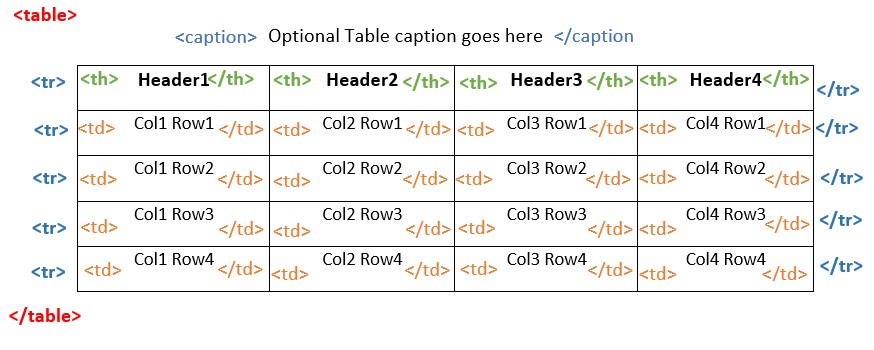
The major tags used to create a table using HTML are;
- <table>…</table> tags for wrapping other table elements and informs the browser that the content should be arranged in table format.
- <tr>…</tr> tags denote a “table row” and the content between these tags is arranged horizontally in rows when rendered in a browser.
- <td>…</td> tags are nested inside the <tr> tags and define a single “table data” cell for content within the row.
- <th>…</th> tags define the content as “table heading” for the given table section, which can be a column, a row, or a group of cells. The <th> element is nested inside <tr> tags just like the <td> element but web browsers will render its content bold and centered in the data cell.
- <caption>…</caption> tags are optional and are used to add a caption about the table data. In most browsers the caption will be the same width as the table and centered by default.
Although information in a table is arranged in rows and columns, HTML markup has no “table column” element. HTML tables are built entirely from rows. Columns are automatically created depending on the alignment of the row data cells.
The number of rows in a table is defined by how many sets of row tags <tr> there are in the table and the number of columns in a table is determined by how many <td> elements are nested within each row element.
It is also important to note that unless altered by an attribute, all <tr> tags within a table must contain the same number of <td> tags. For example, if you wanted to create a table with three rows and four columns, the table must have three sets of <tr> tags that each contain four <td> tags.
If rows differ in the number of cells they can account for, the table may not render correctly in a web browser and may visually appear to be fractured, and/or show spacing gaps.
I’ll now use the example below to show how a table is created using the HTML tags above.
<!DOCTYPE html>
<html>
<head>
<meta charset="utf-8">
<title>HTML Table</title>
</head>
<body>
<table>
<tr>
<th>Header1</th>
<th>Header2</th>
<th>Header3</th>
<th>Header4</th>
</tr>
<tr>
<td>Col1 Row1</td>
<td>Col2 Row1</td>
<td>Col3 Row1</td>
<td>Col4 Row1</td>
</tr>
<tr>
<td>Col1 Row2</td>
<td>Col2 Row2</td>
<td>Col3 Row2</td>
<td>Col4 Row2</td>
</tr>
<tr>
<td>Col1 Row3</td>
<td>Col2 Row3</td>
<td>Col3 Row3</td>
<td>Col4 Row3</td>
</tr>
<tr>
<td>Col1 Row4</td>
<td>Col2 Row4</td>
<td>Col3 Row4</td>
<td>Col4 Row4</td>
</tr>
</table>
</body>
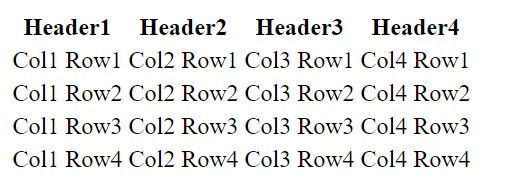
</html>The table will appear as shown below in a browser.
The table above shows the data arranged in rows and columns but still lacks a number of features to appear in a more presentable table format. To achieve this, we need to apply some attributes to the <table> element.
Attributes for the <table> tag:
- border – For determining the thickness of the table’s outside borders and its default value is 0. The border will appear in a 3D style with the table being “raised” off of the page.
- cellpadding – This is the empty space between the border of a table cell and the content of the cell and is important for creating space between text and the table’s borders.
- cellspacing – This alters the thickness of the interior borders of the table.
- bgcolor – This establishes the color that is shown in the background of the table.
- width – This changes the width of the table to a value you specify. You can use either a fixed number of pixels or a percentage value.
- align – used to position the table to either the left, right, or center of the browser’s window.
- background – This is used if you want to display an image as a background for the table and the attribute points to the location of the image file. If the image is smaller in dimensions than the table’s borders, the image will repeat or “tile”.
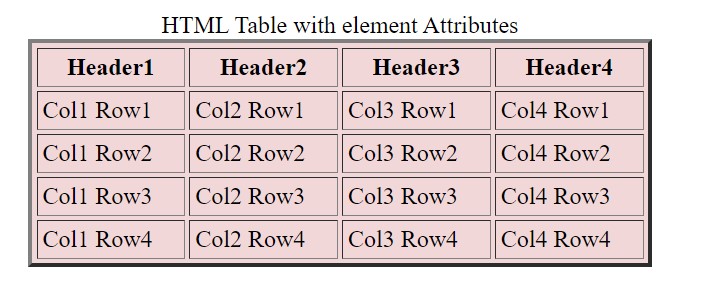
The example below shows how to code the attributes for a table that is centered on the page, has a background color #F2D7D8, a border of 3 pixels, a padding within each cell of 2 pixels, a spacing between cells of 3 pixels and a width of 80% of the browser’s window.

The table will appear as shown below.
You can go ahead and change the values of the various attributes of the <table> element and observe how the appearance of the table changes in the browser.
The structure of a table can be altered further by changing the structure and appearance of individual data cells. This is done using attributes attached to the table data <td> element.
Attributes for the <td> tag:
Any attributes created for a <td> tag will override any identical attributes created by the enclosing <tr> or <table> tags.
- align – This aligns the content of the <td> tag and takes can be center, left, right and justify. The default is “left.”
- valign – specifies the vertical alignment of text content in a cell and can be top, middle, bottom or baseline.
- background – As with the background attribute for the <table> tag above except is only applies to the specific table cell.
- bgcolor – for applying a background color to a specific table cell.
- height – determines the height of the cell with either a specific number in pixels or by a percentage of the height of the table.
- width – This determines the width of the specific table cell with either a number in pixels or a percentage of the width of the table.
- nowrap – This forces the table cell to be shown as wide as possible so as to display text on as few lines as possible. There are no parameters for nowrap.
The colspan and rowspan attributes
These two attributes are very important in structuring HTML tables where there is need for a cell to span multiple columns or multiple rows just like “merge cell” in an Excel spreadsheet. This is common with a header cell acting as a title for a number of columns, or a side-bar that groups rows of entries.
The colspan and rowspan attributes are used with <th> and <td> elements.
colspan – Used to make a single table cell to span the width of more than one cell or column, that is, creating a multi-column cell. The default value is 1.
Always make sure the number of data cells in a given row remains balanced because a table cell with a ‘colspan’ attribute represents merged cells and therefore has to account for the number of data cells it declares.
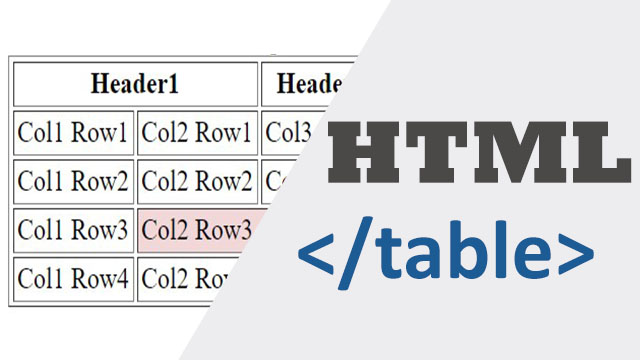
Let me use the example below to demonstrate the use of the colspan attribute better by making some changes to the original HTML table code.
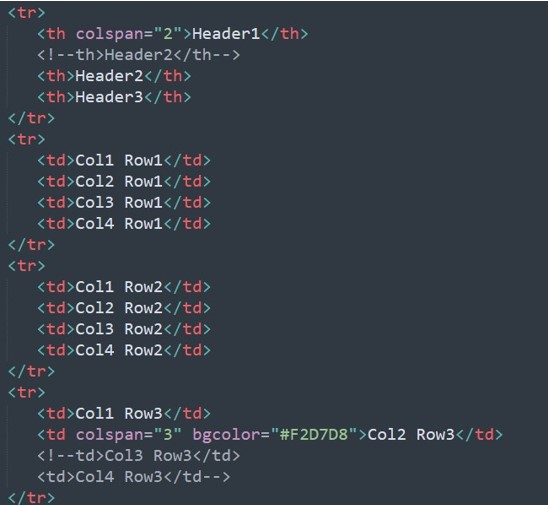
I have included colspan=“2” attribute in the table cell for Header1 therefore this cell now also covers the cell that was initially Header2. I have commented out the original Header2 cell so that you can easily follow the changes in the HTML code.
Also table cell for ‘Col1 Row3’ has an attribute of colspan=“3” meaning that this will cover a total of three columns therefore takes over the space of table cells for ‘Col3 Row3’ and ‘Col4 Row4’ which will need to be removed from the code.
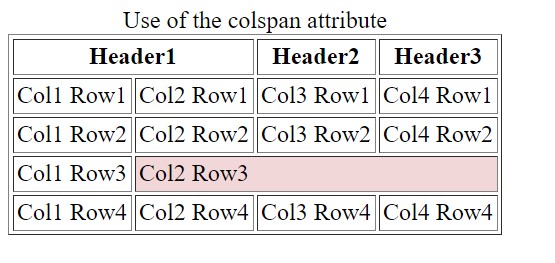
The table will then appear as shown below. Note that the structure of the table is still 5 rows by 4 columns even after merging some cells.
rowspan – This works like the colspan attribute but in this case, it applies to rows of the table not columns, that is, a single table cell can span the height of more than one cell or row.
The value of rowspan attribute shows the number of rows through which the current table cell extends downward through the table and the number should not be greater than the amount of remaining <tr> tags in the table. In other words, there should be “room” for the cell to extend downwards.
In all subsequent rows after a rowspan attribute has been used, you need one less <td> tag.
The example below shows the use of rowspan attribute.
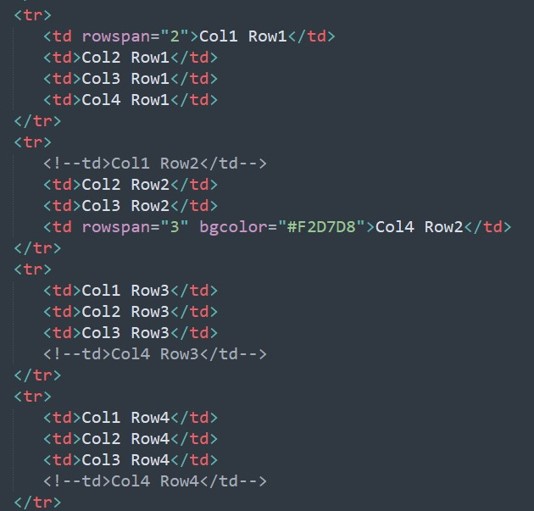
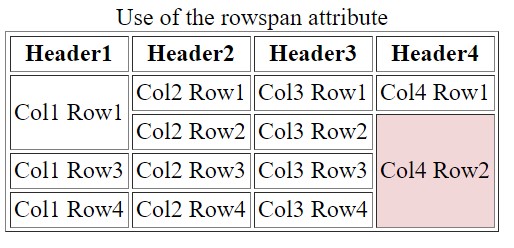
Table cell ‘Col1 Row1’ has rowspan=“2” therefore it will also cover cell ‘Col1 Row2’ and table cell ‘Col4 Row2’ has rowspan=“3” hence will also occupy cells ‘Col4 Row3’ and ‘Col4 Row4’ as shown in the diagram below.
Including sections in the HTML table
In most cases there is no need to specify the various sections of a table therefore using the tags and attributes mentioned earlier is enough for creating a table. However, if the table is very large or spans multiple pages then you may need to divide it into header, body and footer sections for better developer maintenance and to enable browsers to easily scroll through the table.
The following tags are used to section the table.
<thead> tag
The <thead> element acts as a container for the table header contents. It can have one or more <tr> elements with their corresponding <th> elements.
<tbody> tag
The <tbody> element contains a table’s body, that is, it contains all table data other than table heading and table footer content
<tfoot> tag
The <tfoot> element is used to include a summary or disclaimer row at the end of a table. This element can be placed immediately after the <thead> element or after the <tbody> element but whichever way you place it, when rendered in the browser it will automatically appear at the bottom of the table.
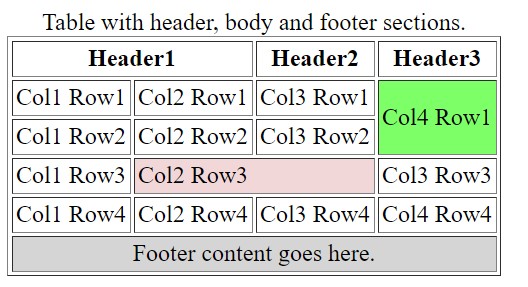
The example below shows how these tags are used to create sections in the HTML table.
<!DOCTYPE html>
<html>
<head>
	<meta charset="utf-8">
	<title>HTML Table</title>
</head>
<body>
<table border="1" cellspacing="2" cellpadding="2">
   <caption> Table with header, body and footer sections.</caption>
   <thead>
      <tr>
         <th colspan="2">Header1</th>
         <th>Header2</th>
         <th>Header3</th>
      </tr>
   </thead>
   <tfoot>
      <tr>
         <td colspan="4" align="center" bgcolor="#D5D5D5">Footer content goes here.</td>
      </tr>
   </tfoot>
   <tbody>
      <tr>
         <td>Col1 Row1</td>
         <td>Col2 Row1</td>
         <td>Col3 Row1</td>
         <td rowspan="2" bgcolor="#7DFF68">Col4 Row1</td>
      </tr>
      <tr>
         <td>Col1 Row2</td>
         <td>Col2 Row2</td>
         <td>Col3 Row2</td>
      </tr>
      <tr>
         <td>Col1 Row3</td>
         <td colspan="2" bgcolor="#F2D7D8">Col2 Row3</td>
         <td>Col3 Row3</td>
      </tr>
      <tr>
         <td>Col1 Row4</td>
         <td>Col2 Row4</td>
         <td>Col3 Row4</td>
         <td>Col4 Row4</td>
      </tr>
   </tbody>
</table>
</body>
</html>
The table will appear as shown below
This tutorial covered the foundation of building tables using HTML. The appearance of these tables can be made even better using CSS styling as I have detailed in the tutorial below;