Remote controlled Car Using Arduino
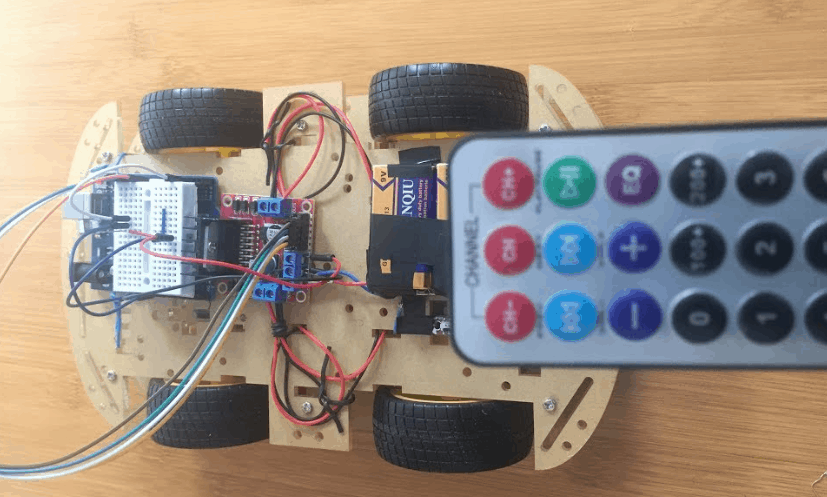
One of the common applications of IR receivers is in remote controlled car using Arduino as shown in this tutorial. The other major component of this project is the L298N motor driver whose functioning has already been discussed in a previous tutorial.
Before proceeding you should first know the working of IR receivers, decoding of IR remotes and DC motor control using the L298N motor driver. This knowledge can be got by visiting the following posts:
Remote controlled car using Arduino schematic.
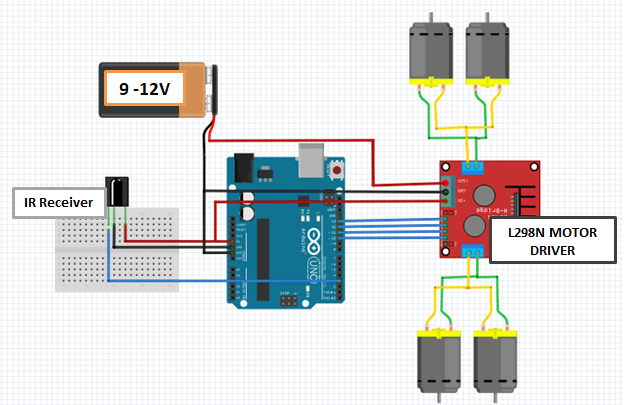
This project of remote controlled car using Arduino is highly dependent on a stable power supply to be able to run the four DC motors for a longer period of time. I recommend using rechargeable batteries. You can buy the parts from this project from these recommended links.
Code for Remote controlled car using Arduino.
#include <IRremote.h>   // including the IR remote library
#define forward  58359 // code received from forward  button
#define backward  5499  // code received from backward button
#define left  25979 // code received from left button
#define right  59295 // code received from right button
#define stop_button  15547 // code received from stop button
// Pins for first motor
int EN_A = 13;
int IN_1 = 12;
int IN_2 = 11;
// Pins for second motor
int EN_B = 8;
int IN_3 = 10;
int IN_4 = 9;
char command;
int receiver_pin = 4;   //Connect the output pin of IR receiver at pin 4
int vcc = 5;            //VCC for IR sensor
int gnd = 6;            //GND for IR sensor
IRrecv receiver(receiver_pin); //Arduino will take output of IR receiver from pin 2
decode_results output;
void setup()
{
  Serial.begin(9600);
  receiver.enableIRIn();  // Start to take the output from IR receiver
  //initializing all the pins as output pins
  pinMode(vcc, OUTPUT);
  pinMode(gnd, OUTPUT);
  pinMode(EN_A, OUTPUT);
  pinMode(EN_B, OUTPUT);
  pinMode(IN_1, OUTPUT);
  pinMode(IN_2, OUTPUT);
  pinMode(IN_3, OUTPUT);
  pinMode(IN_4, OUTPUT);

// Initializing ENA, ENB and vcc pin high
  digitalWrite(vcc, HIGH);
  digitalWrite(EN_A, HIGH);
  digitalWrite(EN_B, HIGH);
}
void loop() {
  if (receiver.decode(&output)) {
    unsigned int value = output.value;
    switch(value) {

  case forward:
      //Moving Forward
  digitalWrite(IN_1, HIGH);
  digitalWrite(IN_2, LOW);
  digitalWrite(IN_3, LOW);
  digitalWrite(IN_4, HIGH);
          break;

case backward:
      //Moving backward
  digitalWrite(IN_1, LOW);
  digitalWrite(IN_2, HIGH);
  digitalWrite(IN_3, HIGH);
  digitalWrite(IN_4, LOW);
         break;

case left:
       //Turning left
  digitalWrite(IN_3, LOW);
  digitalWrite(IN_4, HIGH);
          break;

  case right:
        //Turning Right
  digitalWrite(IN_1, HIGH);
  digitalWrite(IN_2, LOW);
          break;

  case stop_button:
        //Stop
  digitalWrite(IN_1, LOW);
  digitalWrite(IN_2, LOW);
  digitalWrite(IN_3, LOW);
  digitalWrite(IN_4, LOW);
          break;
}
    Serial.println(value);
    receiver.resume();
}
}