How to Connect ESP8266 TO MYSQL Database Using PHP and Arduino IDE.
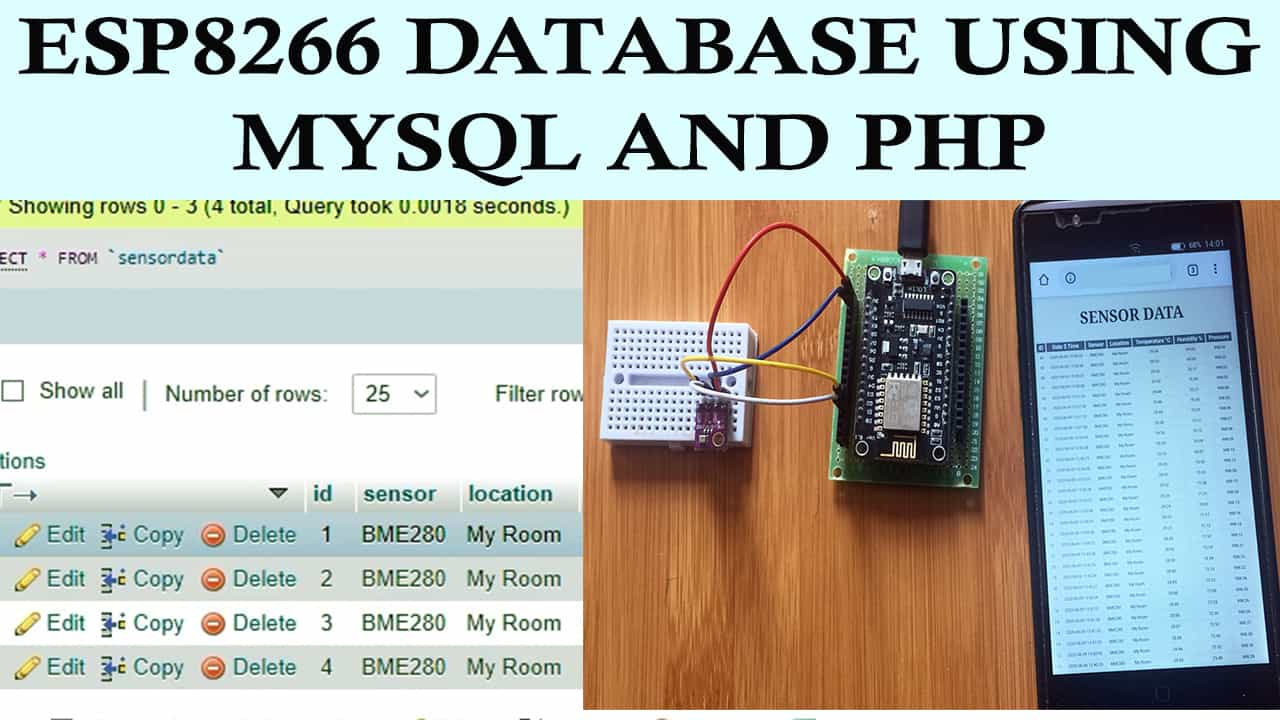
Often times we need to keep track of data from sensors installed in a given place even if we are far away from that place. This can be achieved over the internet where the sensor readings can be observed over a webpage.
In this tutorial I am going to show you how the ESP3266 Nodemcu can be used as a client to send data from sensors to a MYSQL database using PHP script. This data can then be accessed and displayed on a webpage anywhere around the world as long as there is internet connection.
To be able to access the information in the database on a website you need to have a domain name and a hosting account. However, since I am giving a demonstration of how this works, I am going to be using a local host with the help of XAMPP web server to host MySQL database locally on your Windows PC.
In case you need more guidance on how to install XAMPP local server please visit the link below for a step-by-step guide;
Arranging project files in the XAMPP web server
Since we are going to be using XAMPP, you need to have a folder to hold all project files for example in this case I’ll place all the project files inside sensordata folder in the path c: xampp\htdocs\sensordata as shown below.
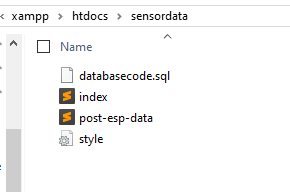
The files include;
databasecode.sql: for creating a table in the MSQL database.
index.php: PHP script that runs to display the database content onto a web page.
post-esp-data.php : contains the PHP script that is responsible for receiving incoming requests from the ESP8266 and inserting the data into a MySQL database.
style.css: for modifying the appearance of our web page.
Preparing the MySQL Database and adding SQL table in the Database.
To access the MYSQL database use the URL: localhost/phpmyadmin/ Then to create a new database you click New > Enter database name> Create as illustrated below where I created a database named mytectutor;
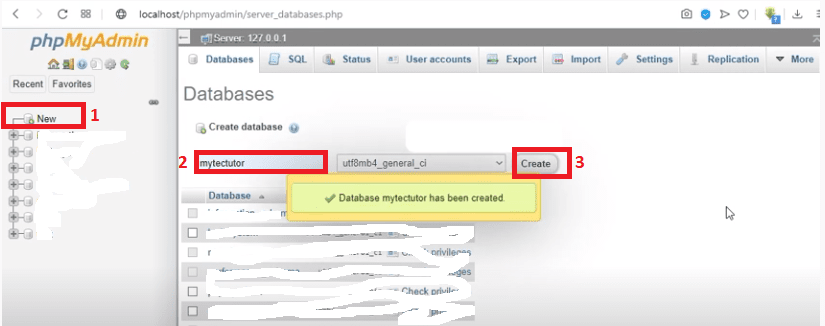
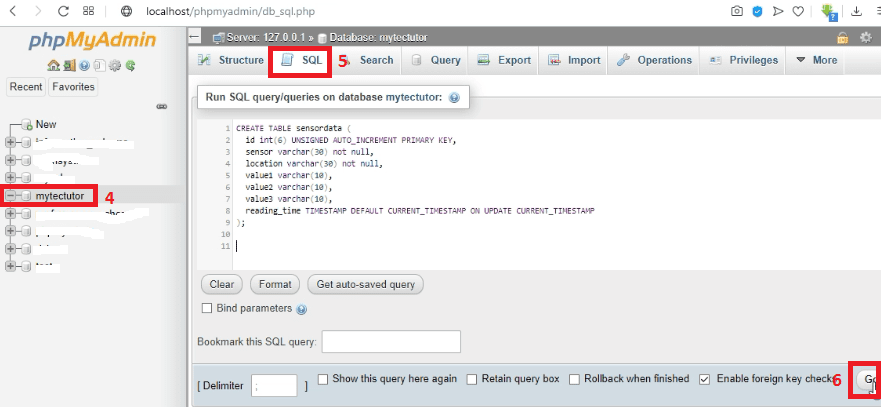
To create a new SQL table in the database, select the new database created (mytectutor) and click SQL tab and insert the SQL query below.
CREATE TABLE sensorData (
id INT(6) UNSIGNED AUTO_INCREMENT PRIMARY KEY,
sensor VARCHAR(30) NOT NULL,
location VARCHAR(30) NOT NULL,
value1 VARCHAR(10),
value2 VARCHAR(10),
value3 VARCHAR(10),
reading_time TIMESTAMP DEFAULT CURRENT_TIMESTAMP ON UPDATE CURRENT_TIMESTAMP
);
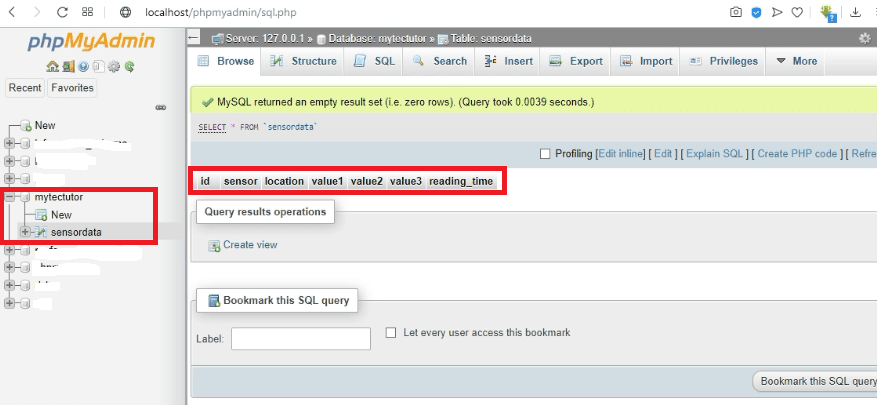
Now you can see the new table called sensordata in the mytectutor database as shown in the figure below;
Inserting data in the MySQL Database using PHP script.
PHP script for receiving incoming requests from the ESP8266 and inserting the data into a MySQL database is in the post-esp-data.php file. You can download this script from the link provided below;
You need to take note of the values below:
$servername = "localhost";
$dbname = "Replace with your database name";
$username = "Replace with your database username";
$password = "Replace with your database password";
$api_key_value = "tPmAT5Ab3j7F9";
Displaying the content in the Database on the Web page.
The script for displaying the database content on a web page is in the index.php file. Don’t forget to replace the values of $dbname, $username and $password with those corresponding to your database. Now the web page can be accessed from the URL: http://localhost/sensordata and will appear as shown below.
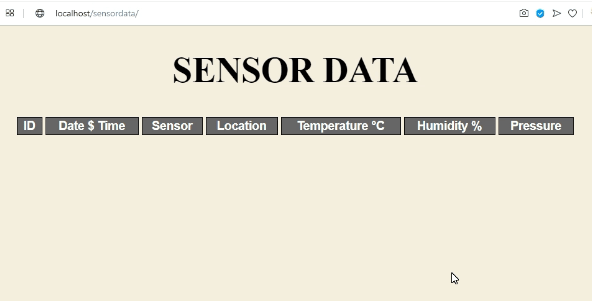
The web page displays the table but is currently empty because there is no data in the database. The appearance of the webpage is determined by the script in the style.css file. Next we shall use the ESP8266 Nodemcu to insert sensor readings into the database.
Download project files: ESP8266 MYSQL Database
Connecting the ESP8266 Nodemcu with BME 280 sensor.
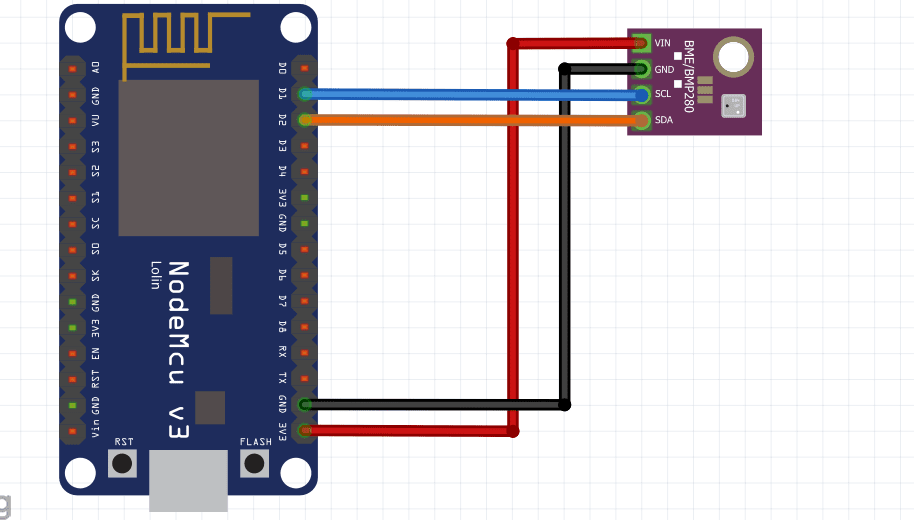
To insert data into the database, we are going to use the ESP8266 Nodemcu and BME280 sensor so that we can insert temperature, humidity, pressure readings into our database every 30 seconds. The setup is as shown in the schematic below.
Code for ESP8266 Nodemcu with BME 280 sensor.
#ifdef ESP32
  #include <WiFi.h>
  #include <HTTPClient.h>
#else
  #include <ESP8266WiFi.h>
  #include <ESP8266HTTPClient.h>
  #include <WiFiClient.h>
#endif

#include <Wire.h>
#include <Adafruit_Sensor.h>
#include <Adafruit_BME280.h>

// Replace with your network credentials
const char* ssid     = "replace with your WiFi ssid";
const char* password = "replace with your WiFi password";

// REPLACE with your Domain name and URL path or IP address with path
const char* serverName = "http://ip_address/sensordata/post-esp-data.php";

// Keep this API Key value to be compatible with the PHP code provided in the project page.
// If you change the apiKeyValue value, the PHP file /post-esp-data.php also needs to have the same key
String apiKeyValue = "tPmAT5Ab3j7F9";

String sensorName = "BME280";
String sensorLocation = "My Room";

#define SEALEVELPRESSURE_HPA (1013.25)
Adafruit_BME280 bme;  // I2C
void setup() {
  Serial.begin(115200);

  WiFi.begin(ssid, password);
  Serial.println("Connecting");
  while(WiFi.status() != WL_CONNECTED) {
    delay(500);
    Serial.print(".");
  }
  Serial.println("");
  Serial.print("Connected to WiFi network with IP Address: ");
  Serial.println(WiFi.localIP());

  // (you can also pass in a Wire library object like &Wire2)
  bool status = bme.begin(0x76);
  if (!status) {
    Serial.println("Could not find a valid BME280 sensor, check wiring or change I2C address!");
    while (1);
  }
}
void loop() {
  //Check WiFi connection status
  if(WiFi.status()== WL_CONNECTED){
    HTTPClient http;

    // Your Domain name with URL path or IP address with path
    http.begin(serverName);

    // Specify content-type header
    http.addHeader("Content-Type", "application/x-www-form-urlencoded");

    // Prepare your HTTP POST request data
    String httpRequestData = "api_key=" + apiKeyValue + "&sensor=" + sensorName
                          + "&location=" + sensorLocation + "&value1=" + String(bme.readTemperature())
+ "&value2=" + String(bme.readHumidity()) + "&value3=" + String(bme.readPressure()/100.0F) + "";
    Serial.print("httpRequestData: ");
    Serial.println(httpRequestData);

    // You can comment the httpRequestData variable above
    // then, use the httpRequestData variable below (for testing purposes without the BME280 sensor)
    //String httpRequestData = "api_key=tPmAT5Ab3j7F9&sensor=BME280&location=Office&value1=24.75&value2=49.54&value3=1005.14";
 // Send HTTP POST request
    int httpResponseCode = http.POST(httpRequestData);

    // If you need an HTTP request with a content type: text/plain
    //http.addHeader("Content-Type", "text/plain");
    //int httpResponseCode = http.POST("Hello, World!");

    // If you need an HTTP request with a content type: application/json, use the following:
    //http.addHeader("Content-Type", "application/json");
    //int httpResponseCode = http.POST("{\"value1\":\"19\",\"value2\":\"67\",\"value3\":\"78\"}");
  if (httpResponseCode>0) {
      Serial.print("HTTP Response code: ");
      Serial.println(httpResponseCode);
    }
    else {
      Serial.print("Error code: ");
      Serial.println(httpResponseCode);
    }
    // Free resources
    http.end();
  }
  else {
    Serial.println("WiFi Disconnected");
  }
  //Send an HTTP POST request every 15 seconds
  delay(15000);
}
Don’t forget to replace the SSID and password corresponding to your network. Also make sure you input the correct domain name and URL path or IP address, so the ESP publishes the sensor readings to your own server.const char* serverName = "http://ip_address/sensordata/post-esp-data.php";
After uploading the above code to the ESP82665 Nodemcu you can be able to access the sensor reading via a web page using the URL; https://localhost/sensordata
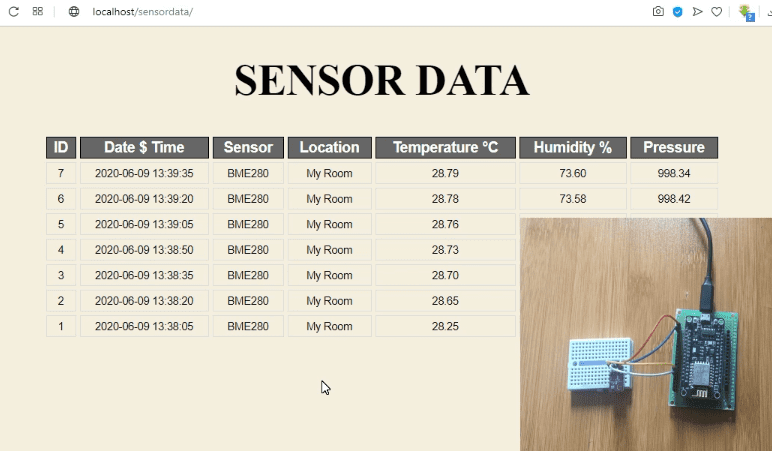
You can also access this webpage using other devices like mobile phone and other computers using the URL: http://ip_address/sensordata
You can also view the readings in the database in the sensordata table.
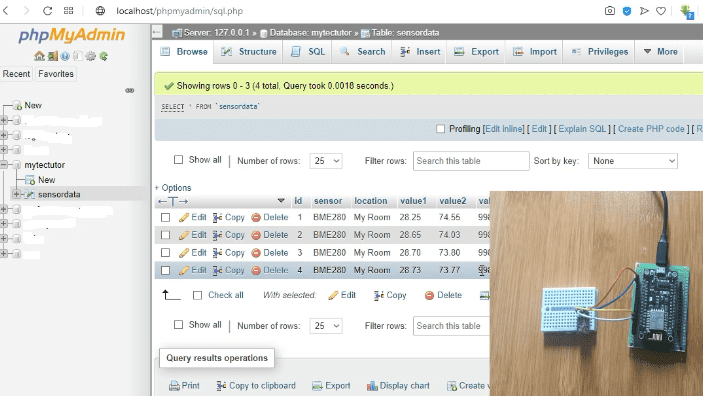
In the above setup we were using a local host with the help of XAMPP web server to host MySQL database locally on your Windows PC. However you can use this knowledge for a real website in case you have your own domain name and hosting account as demonstrated here.

