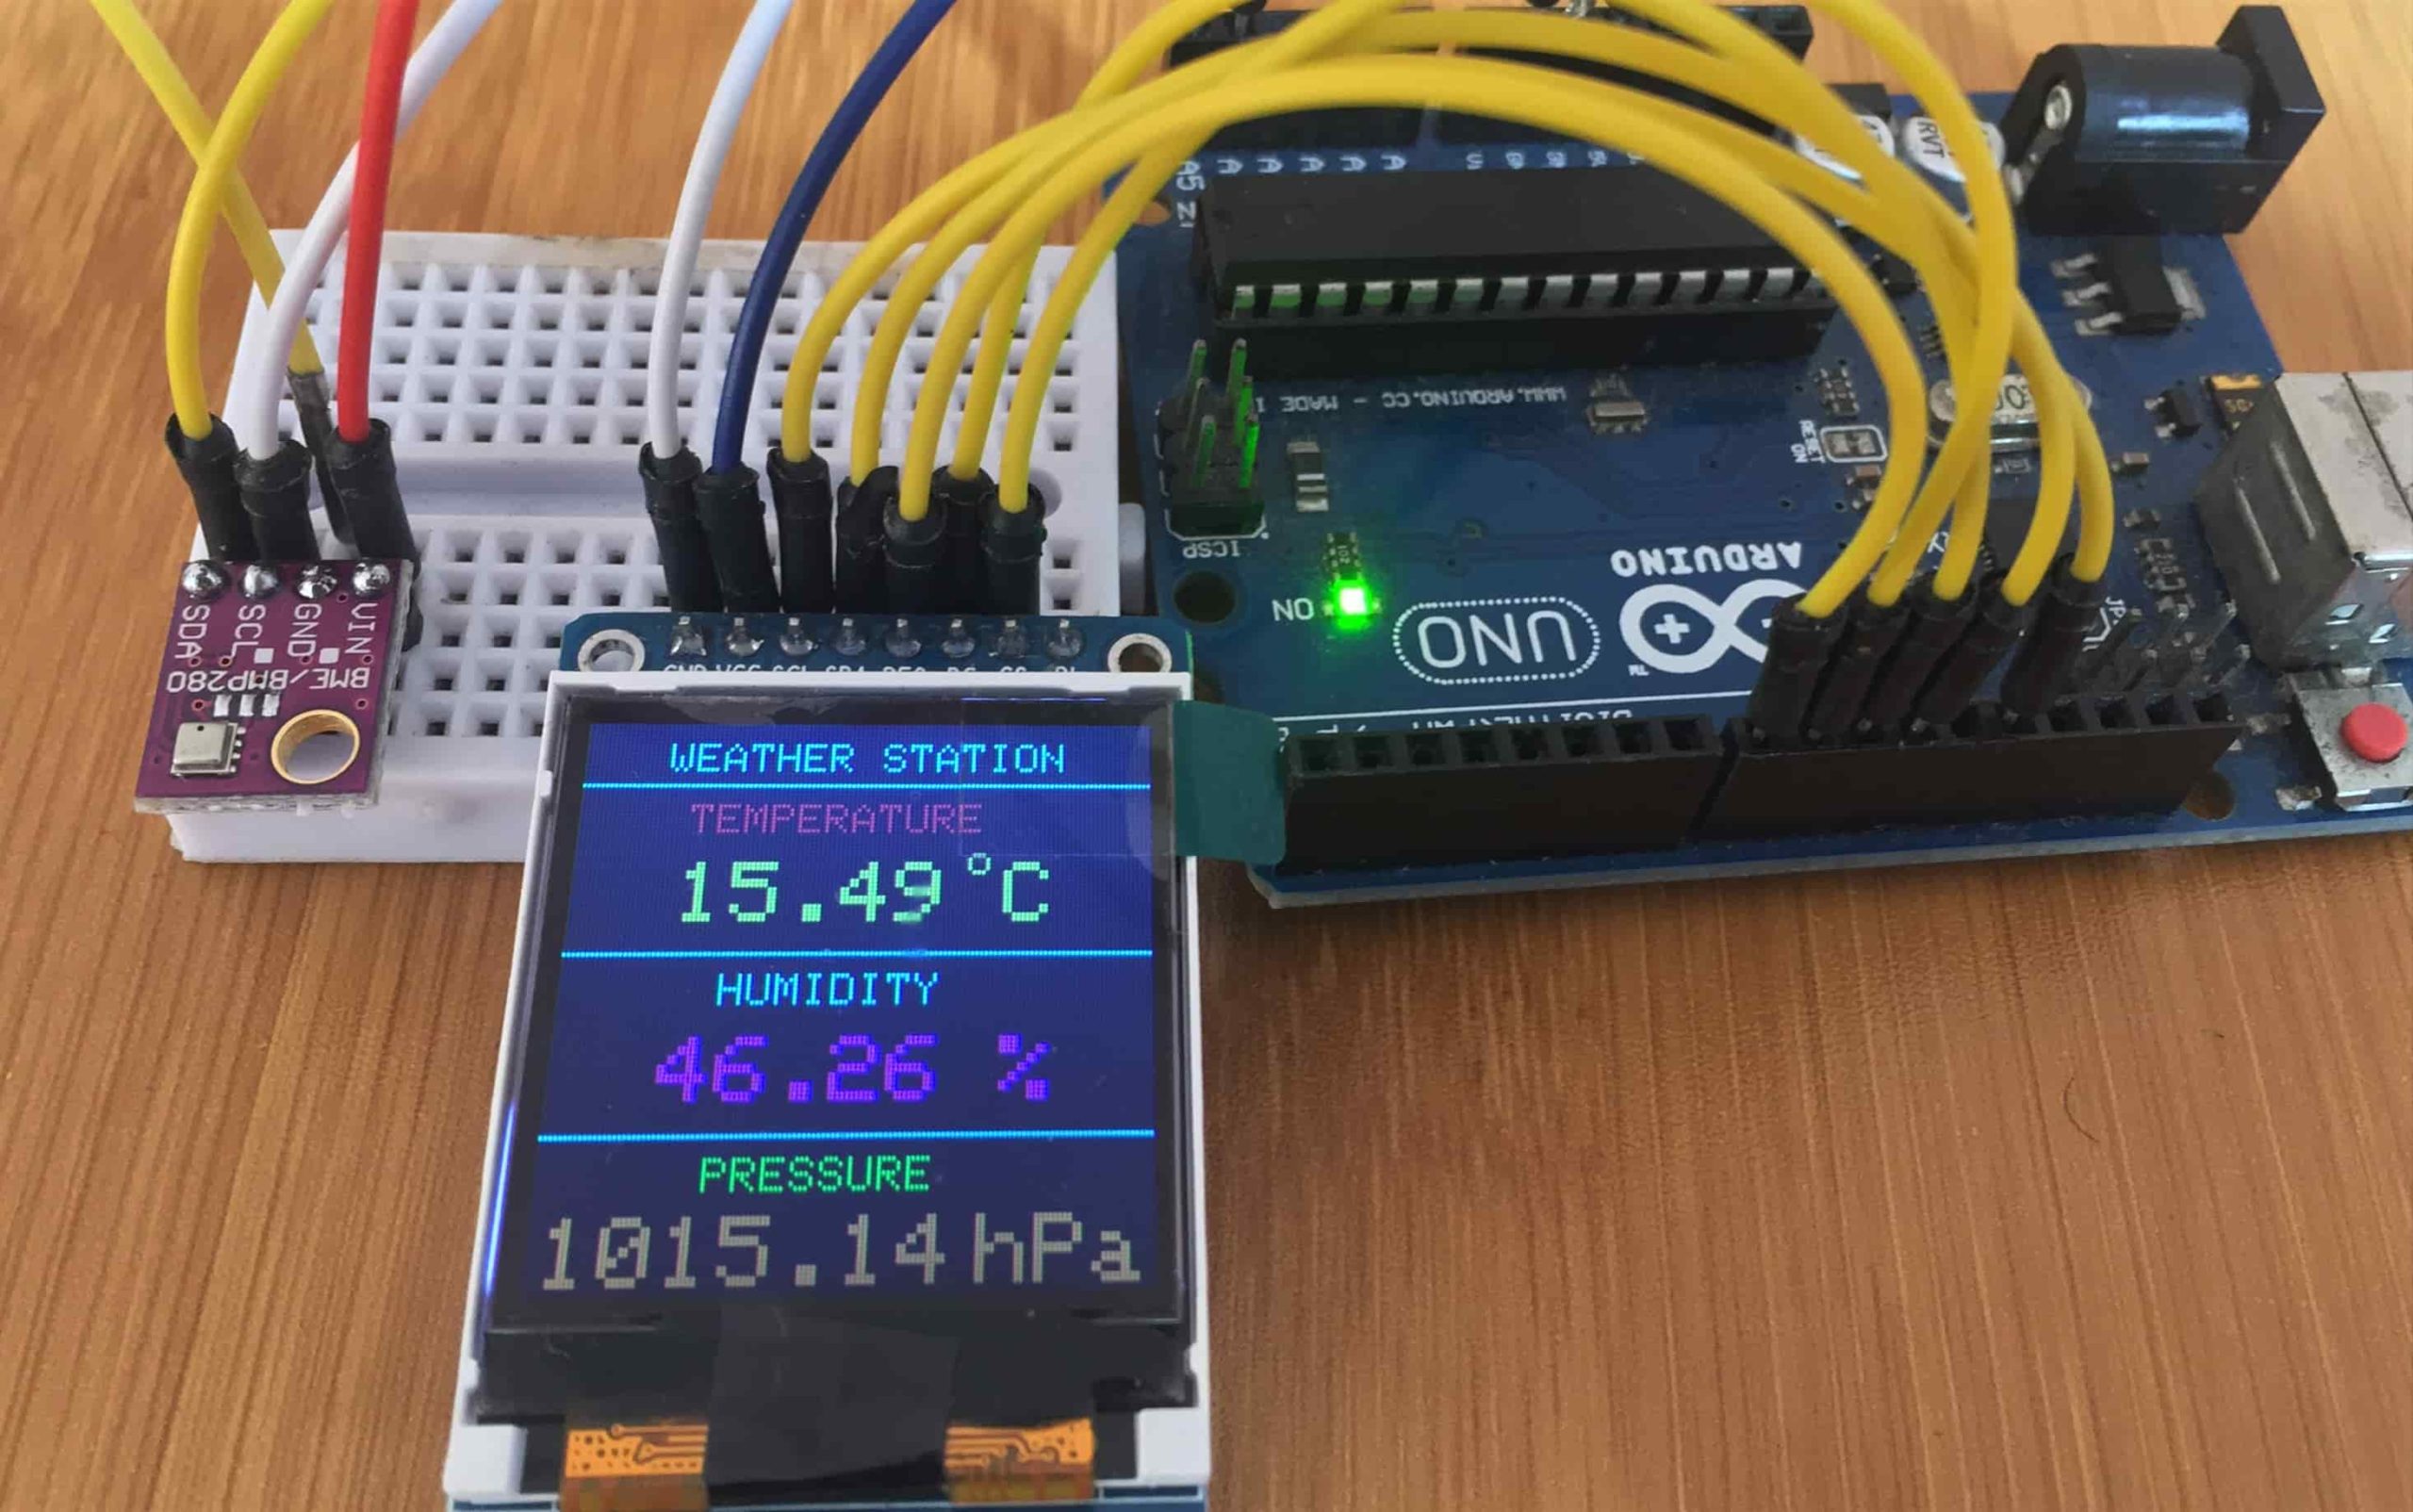
The Bosch BME280 temperature , humidity and pressure sensor can find a number of applications in areas like home automation, outdoor navigation in leisure and sports activities and in weather forecast. In this tutorial we are going to interface this sensor with Arduino to form a simple weather station .
BME280 Sensor description.
The BME280 sensor is specifically developed for mobile applications and wearable gadgets where small size and low power consumption are key design parameters.
This sensor can measure relative humidity from 0 to 100% with ±3% accuracy, barometric pressure from 300Pa to 1100 hPa with ±1 hPa absolute accuracy, and temperature from -40°C to 85°C with ±1.0°C accuracy.
These sensors can either use the I2C or SPI interfaces but for this tutorial we are going to use one using I2C protocol and the sensor has the feature shown in the diagram below.
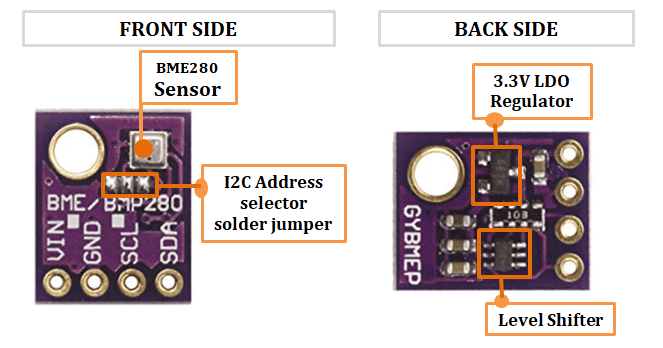
The module comes with an on-board LM6206 3.3V regulator and I2C Level shifter which enable it to be used with 3.3V or 5V logic microcontrollers like Arduino.
By default the middle copper pad of the I2C address selector solder jumper is connected to the left pad which gives the default I2C address of the BME280 module as 0x76.
By default the middle copper pad of the I2C address selector solder jumper is connected to the left pad which gives the default I2C address of the BME280 module as 0x76.
To use 0x77 as the I2C address you need to first remove the connection between the middle and left copper pads by scratching the middle of these pads using a sharp knife. Then connect the middle and the right copper pads using solder.
Connecting the BME280 sensor with Arduino.
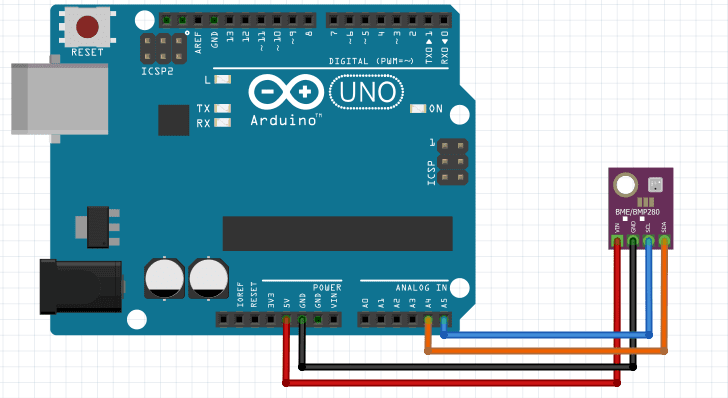
In this case am using the sensor using the I2C protocol therefore the connections with the Arduino UNO will be;
SDA to Arduino Analog pin A4
SCL to Arduino Analog pin A5
GND to Arduino Ground pin
VCC to Arduino 5V
For testing the sensor you need to include the Adafruit_BME280.h and Adafruit_Sensor.h libraries. These libraries are inbuilt in the Arduino IDE and can be installed using the path Sketch > Include Library > Manage Libraries…
After installing these libraries we now use the code below to to read temperature, relative humidity & barometric pressure from BME280 sensor.
#include <Wire.h>
#include <Adafruit_Sensor.h>
#include <Adafruit_BME280.h>

//#define SEALEVELPRESSURE_HPA (1013.25)
#define SEALEVELPRESSURE_HPA (1039.76)

Adafruit_BME280 bme;

void setup() {
  Serial.begin(9600);

  if (!bme.begin(0x76)) {
    Serial.println("Could not find a valid BME280 sensor, check wiring!");
    while (1);
  }
}

void loop() {
 Serial.print("Temperature = ");
  Serial.print(bme.readTemperature());
  Serial.println("*C");

  Serial.print("Pressure = ");
  Serial.print(bme.readPressure() / 100.0F);
  Serial.println("hPa");

  Serial.print("Approx. Altitude = ");
  Serial.print(bme.readAltitude(SEALEVELPRESSURE_HPA));
  Serial.println("m");

  Serial.print("Humidity = ");
  Serial.print(bme.readHumidity());
  Serial.println("%");

  Serial.println();
  delay(1000);
}
When the above code is uploaded to the Arduino we can be able to see the temperature, humidity, pressure and altitude readings from the serial monitor.
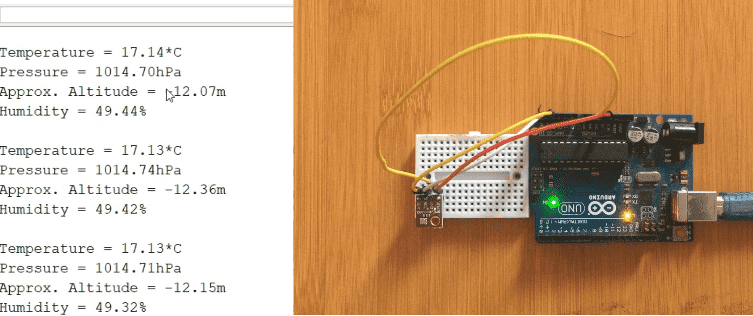
From the above diagram you can observe that the Altitude is negative! This is because altitude measurements depend on the sea level pressure. The standard calculations for this device assumes a pressure of 1013.25hPa at sea level. This means that as you read higher pressure, you need to be below sea level!
This problem can be overcome if you can obtain the pressure value for sea level on the day from a reliable forecast since sea level pressure varies from one place to another and from time to time.
Connecting the BME280 Sensor with ST7735 TFT Display.
We can now add display devices to make a simple weather station showing the temperature, humidity and pressure. In this case we use a 1.44″ ST7735 TFT Color display. You can make reference on how to use this display with Arduino in another of my posts from the link below;
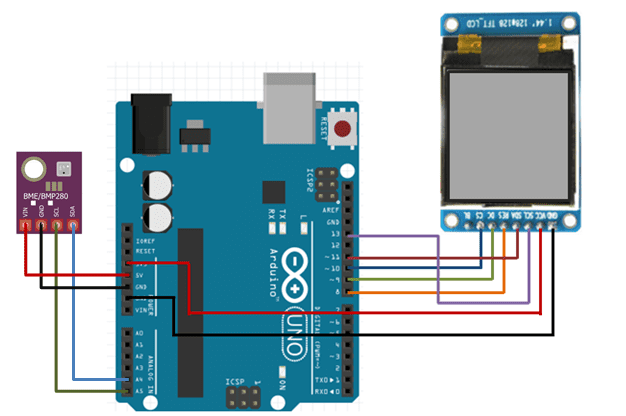
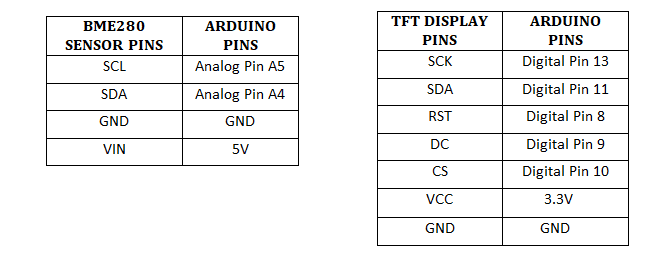
The pin connections for the BME280 sensor and ST7735 TFT Color display with Arduino are done as shown in the tables below.
Code for the BME280 Arduino Weather Station.
#include <SPI.h>
#include <Wire.h>
#include <Adafruit_GFX.h>      // include Adafruit graphics library
#include <Adafruit_ST7735.h>   // include Adafruit ST7735 TFT library
#include <Adafruit_BME280.h>   // include Adafruit BME280 sensor library

#define TFT_RST   8      // TFT RST pin is connected to arduino pin 8
#define TFT_CS    9      // TFT CS  pin is connected to arduino pin 9
#define TFT_DC    10     // TFT DC  pin is connected to arduino pin 10
// initialize ST7735 TFT library
Adafruit_ST7735 tft = Adafruit_ST7735(TFT_CS, TFT_DC, TFT_RST);

// define device I2C address: 0x76 or 0x77
(0x77 is library default address)
#define BME280_I2C_ADDRESS  0x76

Adafruit_BME280  bme280;  // initialize Adafruit BME280 library

void setup(void)
{
  tft.initR(INITR_144GREENTAB);     // initialize a ST7735S chip, black tab
  tft.fillScreen(ST77XX_BLACK);  // fill screen with black color
  tft.drawFastHLine(0, 15 ,  tft.width(), ST77XX_CYAN);   // draw horizontal white line at position (0, 30)

  tft.setTextColor(ST77XX_CYAN, ST77XX_BLACK);  // set text color to white and black background
  tft.setTextSize(1);                 // text size = 1
  //tft.setCursor(4, 0);
// move cursor to position (4, 0) pixel
  //tft.print("ARDUINO + ST7735 TFT");
  tft.setCursor(19, 5);              // move cursor to position (19, 15) pixel
  tft.print("WEATHER STATION");

  // initialize the BME280 sensor
  if( bme280.begin(BME280_I2C_ADDRESS) == 0 )
  {  // connection error or device address wrong!
    tft.setTextColor(ST77XX_RED, ST77XX_CYAN);   // set text color to red and black background
    tft.setTextSize(2);         // text size = 2
    tft.setCursor(5, 76);       // move cursor to position (5, 76) pixel
    tft.print("Connection");
    tft.setCursor(35, 100);
 // move cursor to position (35, 100) pixel
    tft.print("Error");
    while(1);  // stay here
  }

  tft.drawFastHLine(0, 55,  tft.width(), ST77XX_CYAN);  // draw horizontal white line at position (0, 76)
  tft.drawFastHLine(0, 95,  tft.width(), ST77XX_CYAN);  // draw horizontal white line at position (0, 122)
  tft.setTextColor(ST77XX_RED, ST77XX_BLACK);     // set text color to red and black background
  tft.setCursor(25, 20);              // move cursor to position (25, 39) pixel
  tft.print("TEMPERATURE ");
  tft.setTextColor(ST77XX_CYAN, ST77XX_BLACK);  // set text color to cyan and black background
 tft.setCursor(34, 60);              // move cursor to position (34, 85) pixel
  tft.print("HUMIDITY ");
  tft.setTextColor(ST77XX_GREEN, ST7735_BLACK);  // set text color to green and black background
  tft.setCursor(34, 100);              // move cursor to position (34, 131) pixel
  tft.print("PRESSURE ");
  tft.setTextSize(2);                 // text size = 2

}

// main loop
void loop()
{
  char _buffer[8];
  // read temperature, humidity and pressure from the BME280 sensor
  float temp = bme280.readTemperature();    // get temperature in °C
 float humi = bme280.readHumidity();       // get humidity in rH%
  float pres = bme280.readPressure();       // get pressure in Pa

  // print temperature (in °C)
  if(temp < 0)    // if temperature < 0
    sprintf( _buffer, "-%02u.%02u", (int)abs(temp), (int)(abs(temp) * 100) % 100 );
  else            // temperature >= 0
    sprintf( _buffer, " %02u.%02u", (int)temp, (int)(temp * 100) % 100 );
  tft.setTextColor(ST77XX_YELLOW, ST77XX_BLACK);  // set text color to yellow and black background
  tft.setCursor(11, 34);
  tft.print(_buffer);
  tft.drawCircle(89, 34, 2, ST77XX_YELLOW);  // print degree symbol ( ° )
 tft.setCursor(95, 34);
  tft.print("C");

  // 2: print humidity
  sprintf( _buffer, "%02u.%02u %%", (int)humi, (int)(humi * 100) % 100 );
  tft.setTextColor(ST77XX_MAGENTA, ST77XX_BLACK);  // set text color to magenta and black background
  tft.setCursor(23, 74);
  tft.print(_buffer);

  // 3: print pressure (in hPa)
  sprintf( _buffer, "%04u.%02u", (int)(pres/100), (int)((uint32_t)pres % 100) );
  tft.setTextColor(ST77XX_ORANGE, ST77XX_BLACK);  // set text color to orange and black background
  tft.setCursor(3, 112);
  tft.print(_buffer);
  tft.setCursor(91, 112);
  tft.print("hPa");

  delay(1000);    // wait a second

}
When this code is uploaded to the Arduino the temperature, humidity and pressure of the place where we are.

