A rain sensor with Arduino can be used in a number of applications where we need to automatically prevent rain drops wetting certain surfaces. For example to control the movement of car windshield wipers and skylights when it is raining.
Rain sensor hardware overview.
The sensor is made up of a sensing pad where the rain drops are collected. This pad has nickel traces arranged to form positive and negative terminals that get bridged when rain drops fall on the pad.

There is another electronics module based on the LM393 comparator and a sensitivity adjustment potentiometer.
This module is for reading the signals from the sensing pad and sending a digital or analog signal to the Arduino board.
The module pins are GND, VCC, DO and A0.
The sensing pad acts as a variable resistor whose resistance varies according to the amount of water on its surface. This resistance varies inversely with the amount of water on the pad’s surface.
The more water on the surface means better conductivity and will result in a lower resistance and vice versa. The sensor produces an output voltage according to the resistance which when measured we can determine whether it’s raining or not.
Calibration of Rain Sensor using Arduino.
Since I want to use the rain sensor to not only tell whether it is raining or not but to determine the amount of rain, then I have to first do some calibration in order to get some threshold values to use as reference points.
The sensor is connected to the Arduino as shown below:
- GND: is connected to groundVCC: connected to arduino 5V
- AO (Analog Output): connected to analog pin A0 and gives an analog signal between the supply value (5V) to 0V.
- DO (Digital Output): connected to a digital pin and gives a digital output of the internal comparator circuit.

We will mainly use the analog pin A0 since we need to get varies analog values ranging from 0 to 1023.
Code for calibration of the Rain sensor using Arduino.
int sensorValue = 0;
void setup() {
  Serial.begin(9600);
}

void loop(){
  sensorValue = analogRead(A0);
  Serial.println(sensorValue);
  delay(3000);
}
When we upload this code to the Arduino we can be able to read analog values from the serial monitor. The values will begin from 1023 when the pad is dry and when water droplets are placed onto the sensing pad the values begin dropping as shown below.

From the values above we can choose some threshold points. For example in my case, values in the range 800 to 600, the rain is low, for 600 to 500 the amount of rain is medium and values below 460 it is heavy rain.
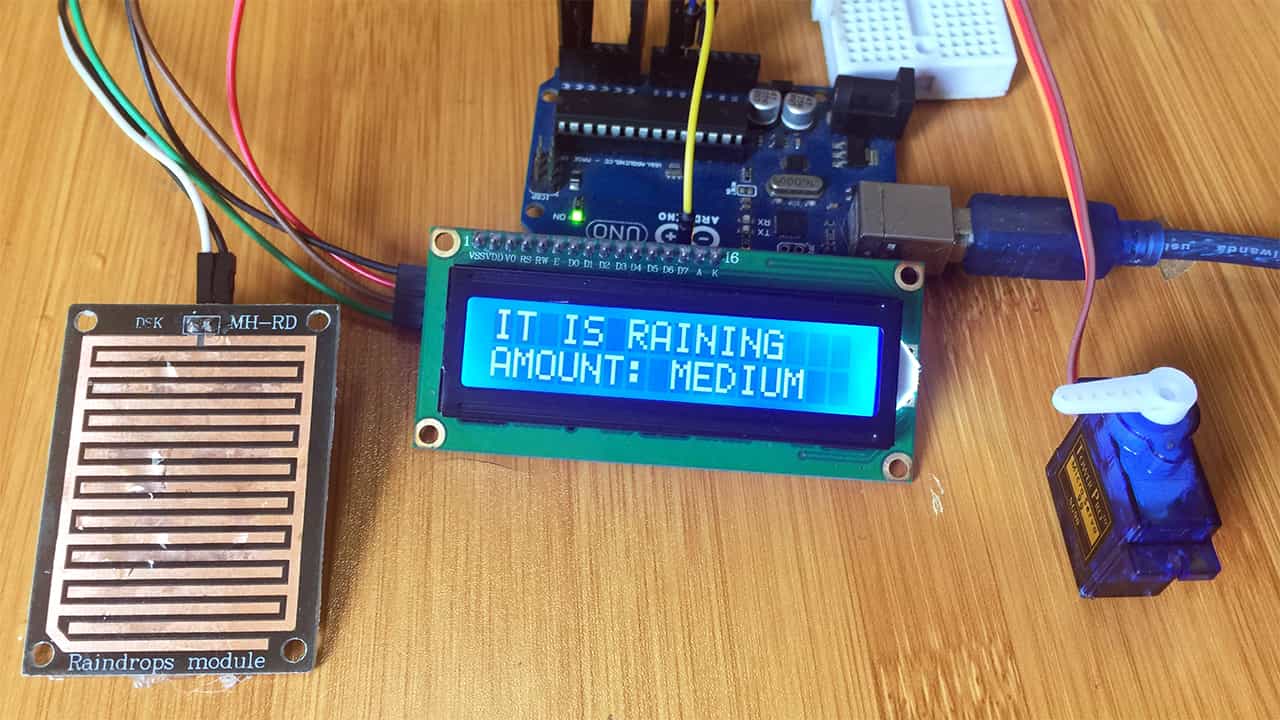
Automatic Car Wiper Using a Rain Sensor, Servo motor and I2C LCD.
After calibrating the rain sensor we can be able to apply it in controlling varies systems. In this case we can control the movement of car windshield wipers. The set up includes a rain sensor, servo motor and I2C LCD and an Arduino board connected as shown in the schematic below.
You can also make reference to my previous posts to learn hoe to use the servo motor and I2C LCD with Arduino:

Code for Automatic car wiper using Rain sensor and Arduino.
The code is for measuring the amount of rain using the analog value thresholds we determined in the calibration stage. The motor speed and lcd also vary depending on the analog signals.
#include <Servo.h>
#include <Wire.h>
#include <LiquidCrystal_I2C.h>

LiquidCrystal_I2C lcd(0x27, 2, 1, 0, 4, 5, 6, 7, 3, POSITIVE);
Servo myservo;

int pos = 0;
int sensorValue = 0;

void setup() {
  Serial.begin(9600);
  lcd.begin(16,2);
  myservo.attach(9);
  lcd.clear();
  lcd.setCursor(0,0);
  lcd.print("   AUTOMATIC ");
  lcd.setCursor(0,1);
  lcd.print("   CAR WIPER ");
  delay(5000);
}

void loop()
{
sensorValue = analogRead(A0);
Serial.println(sensorValue);
if(sensorValue>800){
  myservo.write(180);
  lcd.clear();
  lcd.setCursor(0,0);
  lcd.print("    NO RAIN ");
  delay(1000);
  }
if(sensorValue<=800 && sensorValue>600){
  lcd.print("AMOUNT: LOW ");
  lcd.setCursor(0,0);
  lcd.print("IT IS RAINING
  ");
  lcd.setCursor(0,1);
  for (pos = 180; pos >= 0; pos-=1) {
    myservo.write(pos);
    delay(3);
  }
  for (pos = 0; pos <= 180; pos+=1) {
    myservo.write(pos);
    delay(3);
  }
  delay(2000);
}

if(sensorValue<=600 && sensorValue>460){
  lcd.setCursor(0,0);
  lcd.print("IT IS RAINING   ");
  lcd.setCursor(0,1);
  lcd.print("AMOUNT: MEDIUM ");
  for (pos = 180; pos >= 0; pos-=1) {
    myservo.write(pos);
    delay(3);
  }
  for (pos = 0; pos <= 180; pos+=1) {
    myservo.write(pos);
    delay(3);
  }
  delay(1000);
}

if(sensorValue<460){
  lcd.setCursor(0,0);
  lcd.print("IT IS RAINING   ");
  lcd.setCursor(0,1);
  lcd.print("AMOUNT: HIGH    ");
  for (pos = 180; pos >= 0; pos-=1) {
    myservo.write(pos);
    delay(3);
  }
  for (pos = 0; pos <= 180; pos+=1) {
    myservo.write(pos);
    delay(3);
  }
  delay(100);
}

}
When the above code is uploaded to the Arduino board, the speed of rotation of the servo motor will depend on the amount of rain detected and in each case the amount will be displayed on the LCD.


