Data logging is very important in projects involving collection, analysis and interpretation of data. For example if we know the temperature, humidity, pressure and other weather conditions of a given area over a given period of time, we can easily plan for different seasons and prepare for any disasters if they are to occur.
In this tutorial I want to show you how make a simple Arduino based Data logger using a micro SD card and how we can also do real time data analysis using Microsoft Excel with the help of the PLX-DAQ tool.
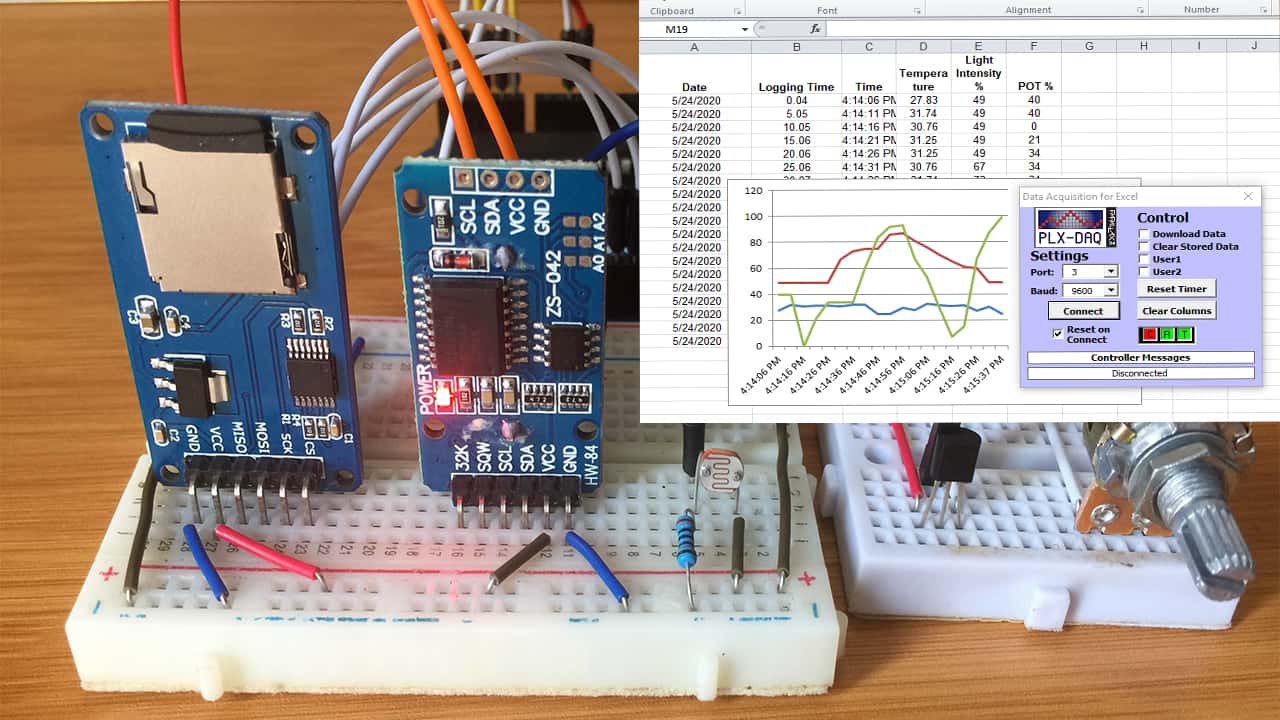
This data logger is going to save the date, time, temperature, light intensity and an analog reading on a micro SD card. At the same time I will also be able to observe this data on an Excel spreadsheet on my computer through serial communication with the help of the PLX-DAQ tool.
Setting up of the Arduino Data logger with SD Card.
The data logger consists of a DS3231 RTC module, a light dependent resistor, LM35 temperature sensor, a potentiometer and a micro SD card module all attached to Arduino as shown below.

The connections for the DS3231 RTC and SD Card modules to Arduino can be a bit confusing so I will simplify them using the table below.

The DS3231 RTC module is interfaced with Arduino using the I2C communication (SCL, SDA). The SD card module works with standard micro SD cards whose operating voltage is 3.3 V. However the module has a voltage regulator and a level shifter which enables it to use the 5V pins of the Arduino board.
The SD Card Module have six pins, two for powering the module, the VCC and the GND pins, and four more pins for the SPI communication (MISO, MOSI, SCK, CS). I have used pin 10 as the ChipSelect (CS) pin but this can be changed to any other available digital pin.
The potentiometer, light dependent resistor and LM35 temperature sensor signal pins are connected to analog pins A0, A1 and A2 respectively. These devices give outputs in analog form which are converted using Arduino’s in built ADC to the required parameters like temperature and light intensity.
If you are not very familiar with the working of sensors and modules with Arduino you can make reference from my previous posts using these links;
- How to to use a Micro SD Card module with Arduino.
- DS3231 RTC module Interfacing with Arduino.
- How to use the LM35 temperature sensor with Arduino.
- Light Dependent Resistor with Arduino.
- How to use a potentiometer with Arduino.
Code for running the Data logger
To use the SD card with Arduino we need to have the SD.h and SPI.h libraries which are part of the Arduino IDE by default.
#include <DS3231.h>
#include <SPI.h>
#include <SD.h>

int temp_sensor = A2;
int ldr_sensor = A1;
int pot = A0;

File dataFile;

float temperature;
int light_percentage;
int pot_percentage;

const int chipSelect = 10; //SD card CS pin connected to pin 10 of Arduino

// Init the DS3231 using the hardware interface
DS3231  rtc(SDA, SCL);

void setup()
{
    rtc.begin();

   Serial.begin(9600);


  // setup for the SD card
  Serial.print("Initializing SD card...");

  if(!SD.begin(chipSelect)) {
    Serial.println("initialization failed!");
    return;
  }
  Serial.println("initialization done.");

  //open file
  dataFile = SD.open("LOGDATA.txt", FILE_WRITE);

  // if the file opened ok, write to it:
  if (dataFile) {
    Serial.println("File opened ok");
    // print the headings for our data
    dataFile.println("Date,Time,Temperature,Light Intensity%,POT%");
  }
 dataFile.close();

  Serial.println("CLEARDATA"); //clears up any data left from previous projects
  Serial.println("LABEL,Date,Logging Time,Time,Temperature,Light Intensity %, POT %"); //always write LABEL, to indicate it as first line
  Serial.println("RESETTIMER");
}

void loop()
{
    int temp_sensor_val = analogRead(temp_sensor);
    int ldr_sensor_val = analogRead(ldr_sensor);
    int pot_val = analogRead(pot);

    int light_percentage = map(ldr_sensor_val, 0, 1023, 0, 100);
    int pot_percentage = map(pot_val, 0,
1023, 0, 100);

    float millivolts = (temp_sensor_val / 1024.0) * 5000;
    float temperature = millivolts / 10;  // temperature in degrees celcius

    dataFile = SD.open("LOGDATA.txt", FILE_WRITE);

  // if the file is available, write to it:
  if (dataFile) {
    dataFile.print(rtc.getDateStr()); //Store date on SD card
    dataFile.print(","); //Move to next column using a ","

    dataFile.print(rtc.getTimeStr()); //Store date on SD card
    dataFile.print(","); //Move to next column using a ","

    dataFile.print(temperature);
//Store date on SD card
    dataFile.print(","); //Move to next column using a ","

    dataFile.print(light_percentage); //Store date on SD card
    dataFile.print(","); //Move to next column using a ","

    dataFile.print(pot_percentage); //Store date on SD card
    dataFile.print(","); //Move to next column using a ","

    dataFile.println(); //End of Row move to next row
    dataFile.close(); //Close the file
  }
  else
  Serial.println("OOPS!! SD card writing failed");

    //write to plx-dax

  Serial.print("DATA, DATE, TIMER, TIME,"); //always write "DATA" to Indicate the following as Data

    Serial.print(temperature); //Store date on Excel
    Serial.print(","); //Move to next column using a ","

    Serial.print(light_percentage); //Store date on Excel
    Serial.print(","); //Move to next column using a ","

    Serial.print(pot_percentage); //Store date on Excel
    Serial.print(","); //Move to next column using a ","

    Serial.println(); //End of Row move to next row

 delay(3000); //Wait for 3 seconds before writing the next data
}
First, we need to create a ‘File’ object. Then we initialize the SD card by using the SD.open() function to create a new text file named “LOGDATA.txt”, including the FILE_WRITE argument meaning that we can both read and write to the file. The content to enter in the first row is also written in initializing the SD card.
i).The file name you choose to use must be of the 8.3 format, that is, the part before the dot must be a maximum 8 character string and “.txt” is the 3 character extension. Writing to the SD card will not be possible if you use a file name longer than this format.
ii). If the file already exists the SD.open() function will just open it.
Writing Data to SD card
The DS3231 RTC module gives us the time and date and the other sensors we attached to the Arduino can provide us with temperature and light intensity values. These parameters can be stored in the SD card using the line dataFile.print(); The end of a row is given by dataFile.println();
When saving the values in the SD card, each parameter is separated the by a comma “,” which acts as a delimiter. This is very important when it comes to entering the data in an Excel sheet as will be seen later on.
Connecting Arduino to PLX-DAQ
The PLX-DAQ software is a Microsoft Excel add-on tool that enables us to write values from Arduino to Excel in real time via serial communication with a computer. This makes it easy to write and analyze the incoming data.
When using PLX-DAQ with Arduino there is no need for using the DS3231 RTC module to keep track of date and time. The tool makes it possible to use the date and time running on your computer and save them directly in Excel.
I have explained the working of PLX-DAQ with Arduino in detail in a previous tutorial. If you want to know more about the functions and keywords used in coding for this interfacing you can check out the post using the link below.
Note: Do not use serial monitor when using PLX_DAQ software.
How the Arduino Data Logger using SD card works
After uploading the code into the Arduino board, data logging will begin and the date, time, temperature, light intensity and percentage of potentiometer values will be stored on the SD card.
At the same time you can open the PLX-DAQ Excel spreadsheet on your computer and observe the values being logged in real time. You can even do some analysis of the values like shown below.

Getting Data from the SD card
The SD card can be removed from the SD card module after logging data for a required period of time and the data can be accessed from a computer. In my case I can find the data from the text file I named ‘LOGDATA.txt’ which can be opened using any text editor like notepad.

In order to analyze this data we need to open it in Excel as a CSV (Comma Separated Value) file. To do this open Excel ;
1. Click on, Data > From Text. Then select the “LOGDATA.txt” file from the SD card. This will open a Text Import Wizard.
2. Click on “Next” and select comma as a delimiter. Click on “Next” again. Then Finish.
3. Now your values will be opened in a Excel file as shown below

The way the values are displayed in Excel corresponds to the way they were written in the SD card. From the notepad file, every comma denotes move to the next column. After entering the data in the Excel spreadsheet you can then do analysis using the different capabilities of Microsoft excel.


